

How To Draw Poses From Imagination
How to Draw from Imagination
Updated: 24 Dec 2022
In this guide, I will focus on the minimum necessary nuts yous need to know for cartoon from imagination.
Drawing from imagination means the knowledge to draw the basic shapes from different angles (in perspective), and the way to nowadays them (rendering).
Afterwards getting the construction right, render is the last consequence with consideration to materials, lighting, texture (including color), shadows and reflections.
Annotation:
This guide focuses mainly on cartoon objects, both for concept art and product design.
The Basics:
- Boxes
- Foreshortening
- Ellipses
- Cylinders
- Rendering
- Spheres
The Craft:
- Concept fine art
- Production pattern
Boxes
If you practice not have some bones understanding of linear perspective, visit my beginners guide to linear perspective.
Here, I will highlight the important and most applied things y'all need to know.
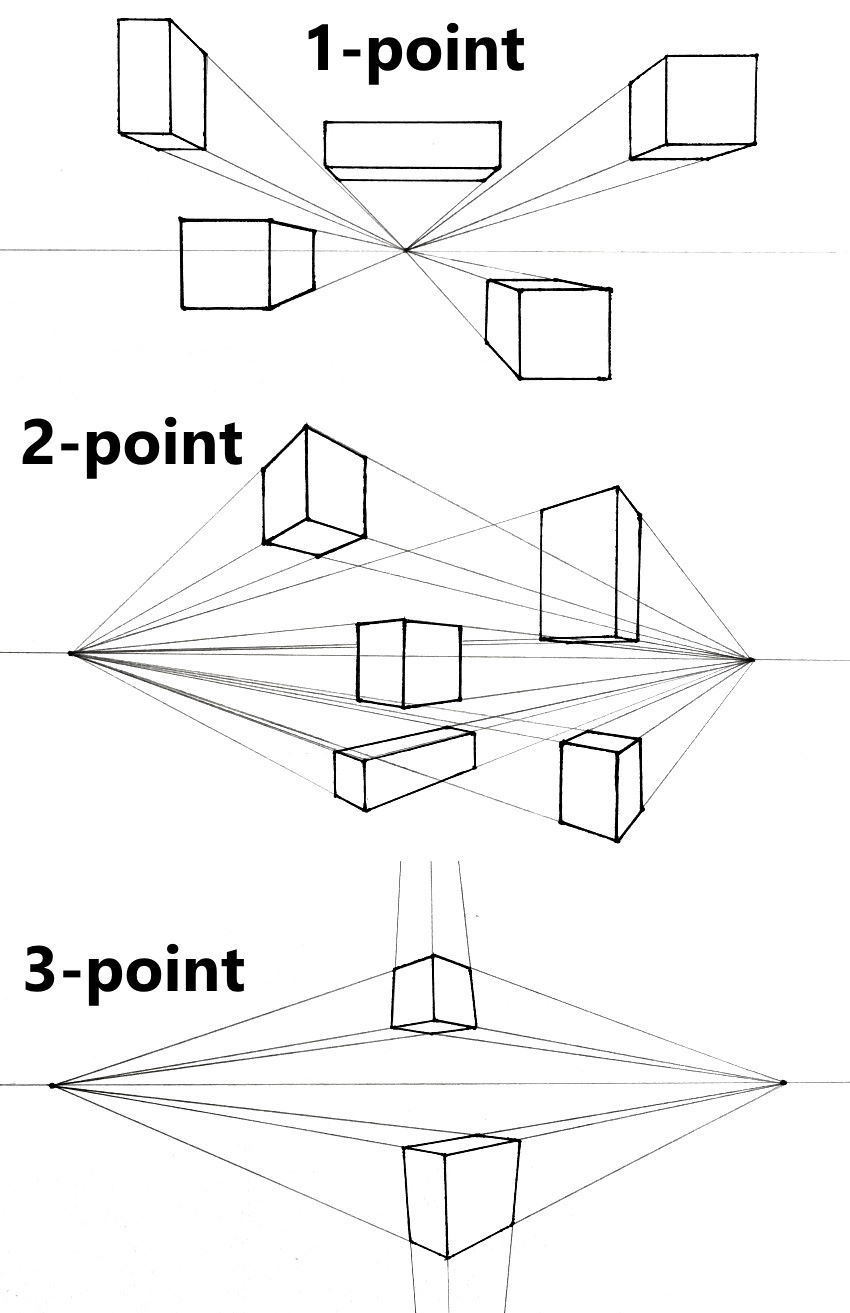
Start past drawing some boxes in i-, 2- and 3-bespeak perspective.
Depict them above, on and below the horizon line:
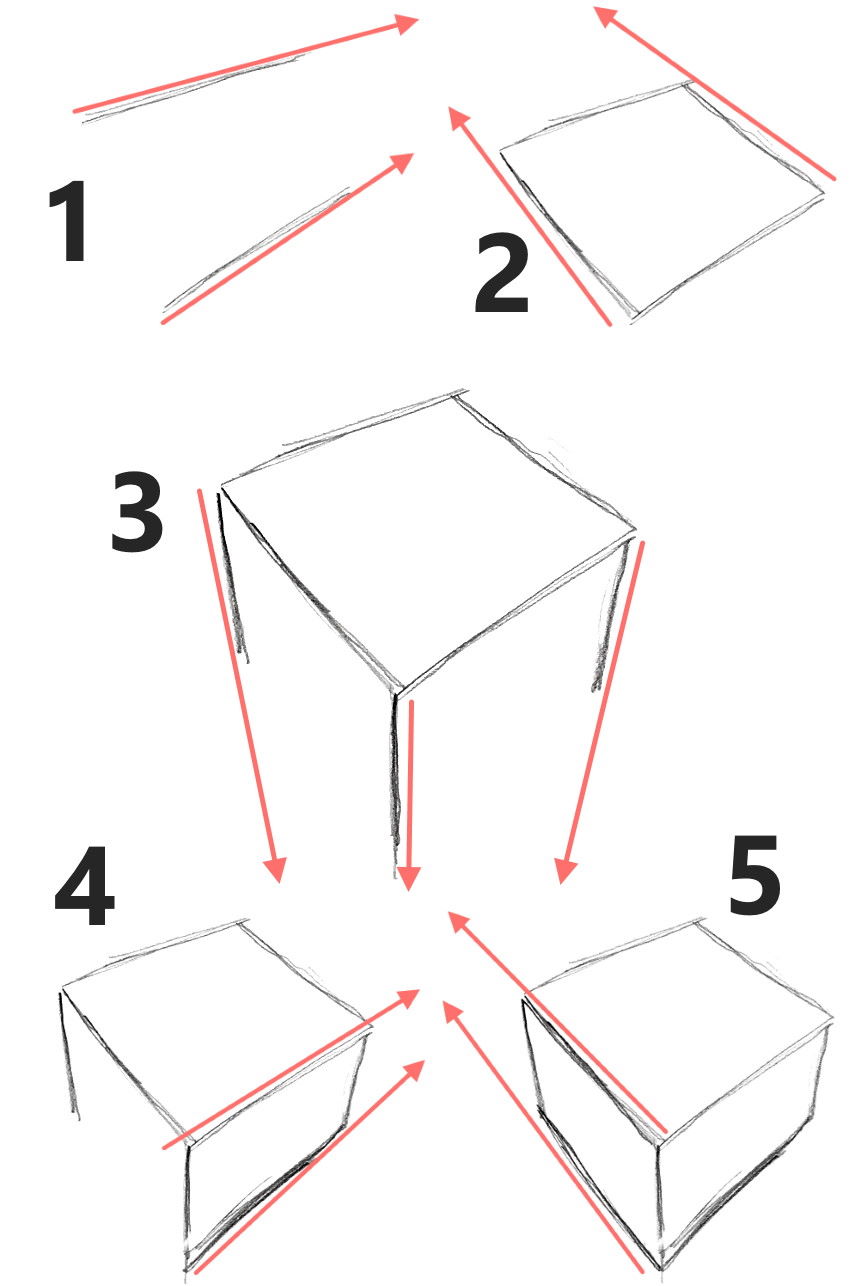
Next, draw some boxes from imagination, but with attention to perspective.
They do non have to be perfect, simply to get used to drawing in freehand style, pregnant with no ruler or vanishing points (imagine where the vanishing points should be).
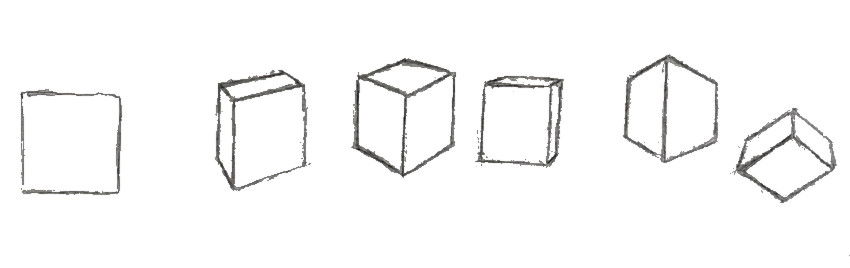
If you struggle with drawing boxes, remember that every fix of lines (which are parallel in real life), will converge in perspective.
The following is an example of drawing simple boxes from imagination, and turning them into treasure chests.
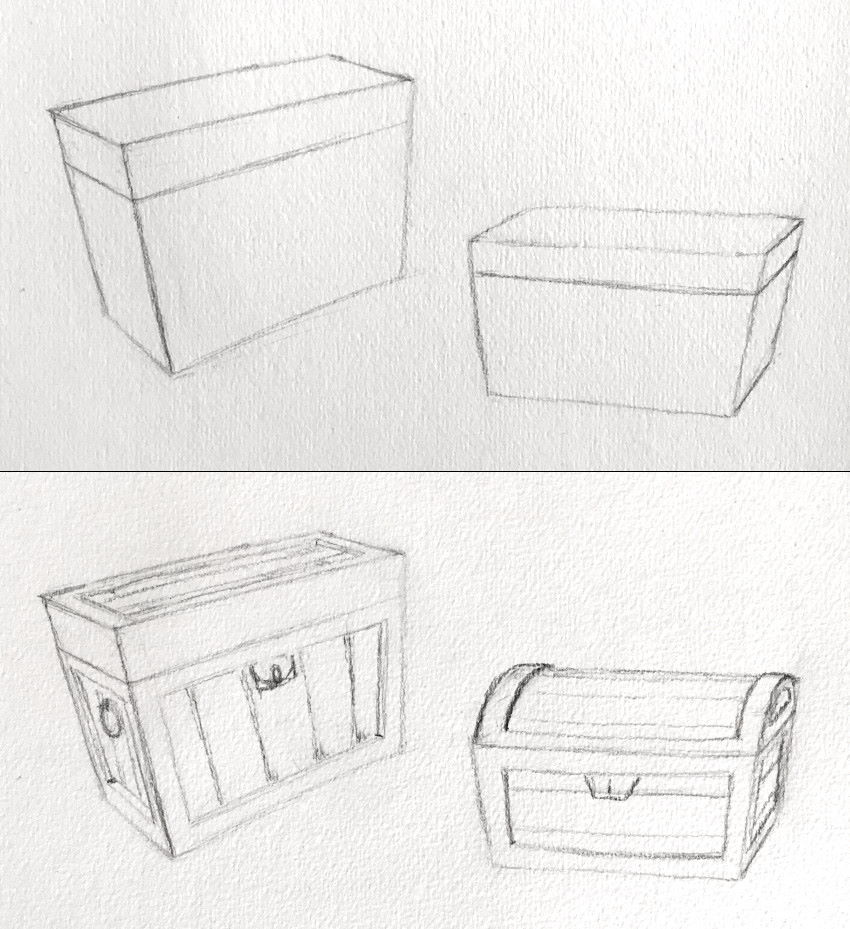
After we will learn how to render our drawings.
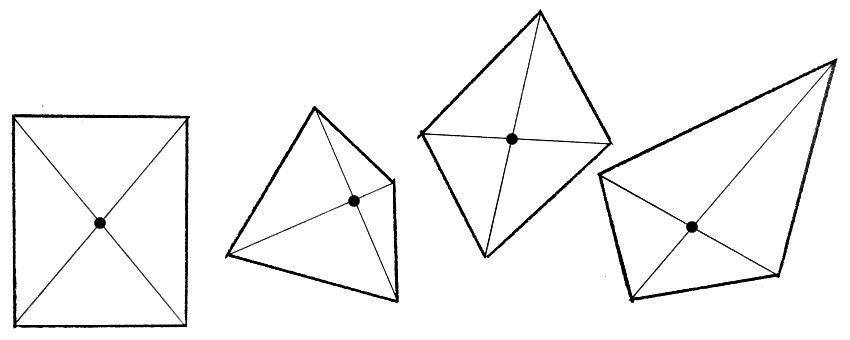
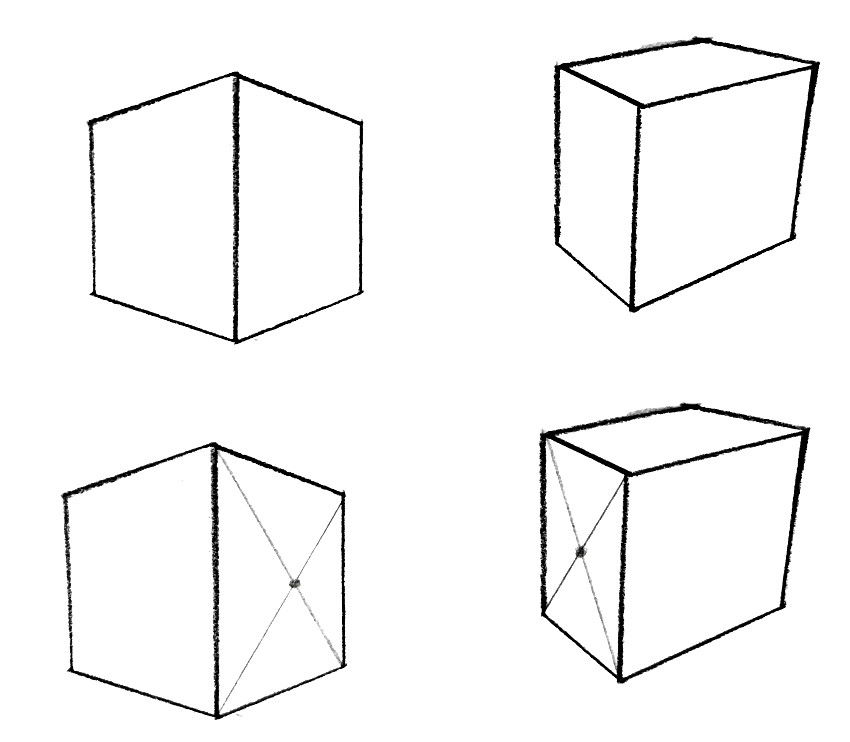
A very helpful thing to know is finding the center of a airplane (rectangle) in perspective.
To do that, depict two diagonals from the corners of Whatsoever rectangle:
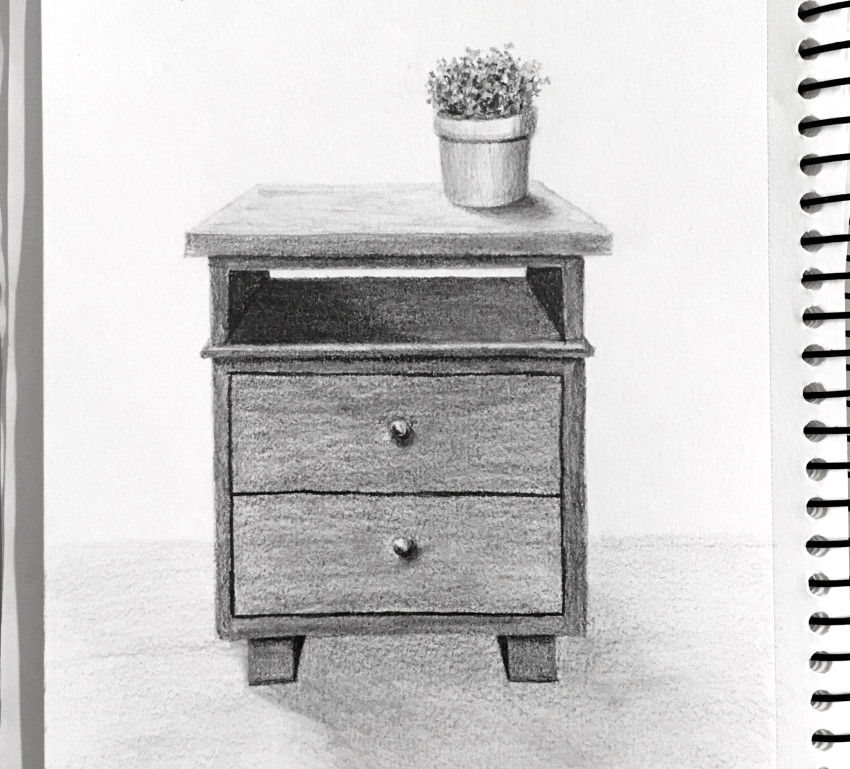
Use this knowledge to draw a nightstand.
Start by drawing a box and find the heart for ane plane.
Use the center bespeak to add a line (in perspective) to create two drawers.
Use the aforementioned center point to find the position for the handles.
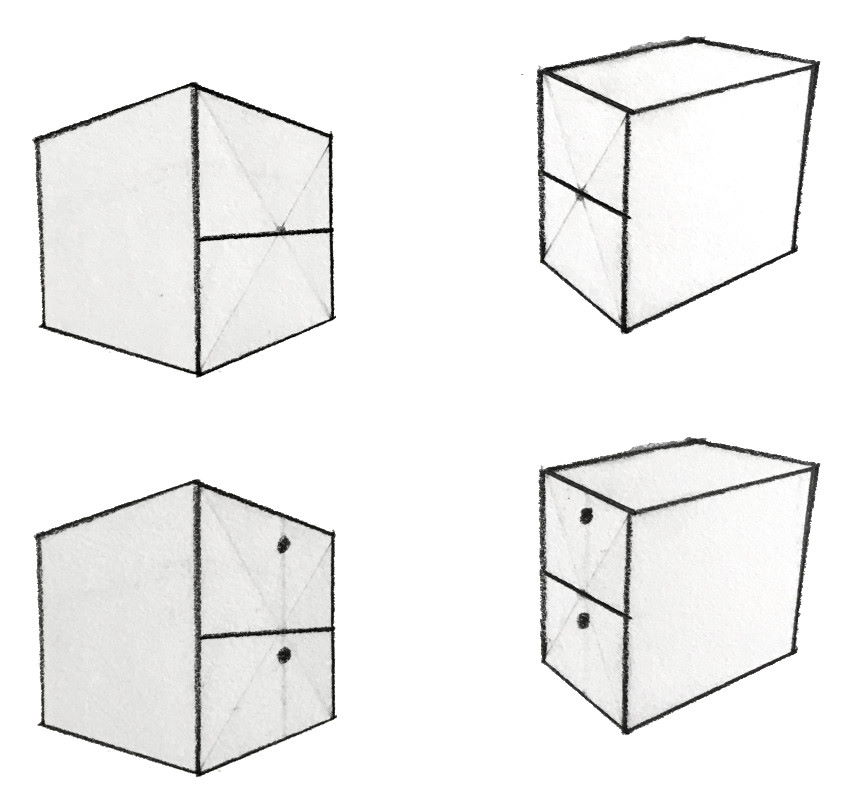
Now you can design your ain nightstands (or other box-shaped objects).
To run into the supply and equipment I apply for cartoon, visit my guide for cartoon materials.
Important:
When cartoon from imagination, I rarely utilize vanishing points.
Learning linear perspective is important to understand how to draw objects in perspective, from different angles.
With some do, it is possible to estimate where the vanishing points are.
With more than practise and experience, it becomes natural to draw anything from any angle.
Remember:
There are ii main rules for linear perspective.
1. The farther an object is, the smaller information technology volition look.
2. Objects are subject to foreshortening.
Foreshortening
Foreshortening, sometimes called "artist'south nightmare", is not that scary.
Information technology is the manner you come across things that are along your line of sight. Pregnant, continuous.
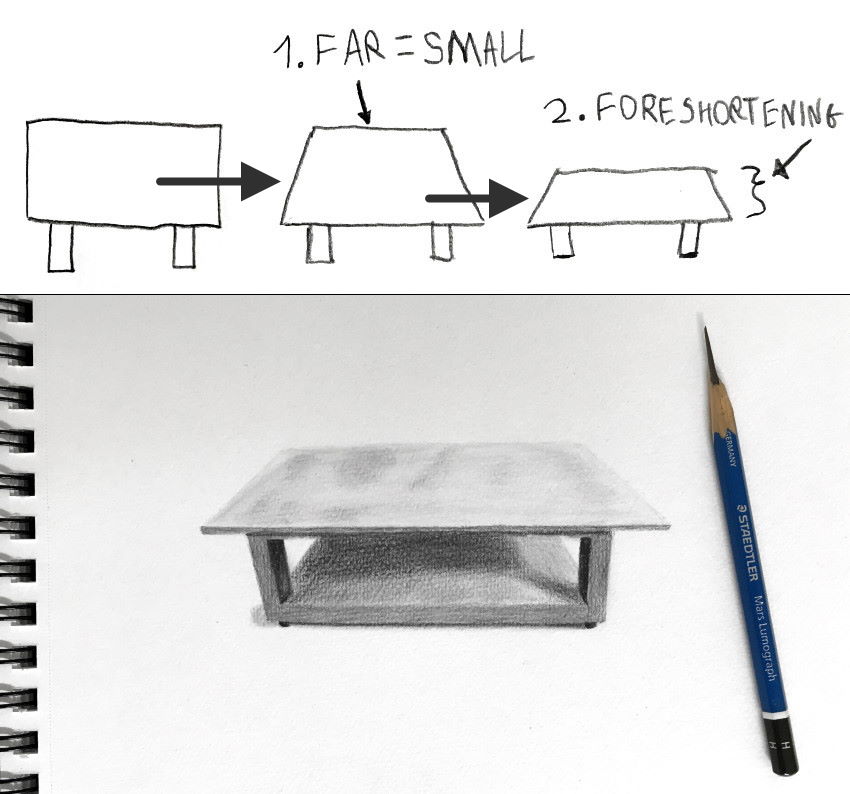
When the elevation part of a box is in front of you, you see it every bit a rectangle with right angles (90 degrees).
When you rotate the box, its top role starts to be forth your line of sight, and therefore becomes sorter:
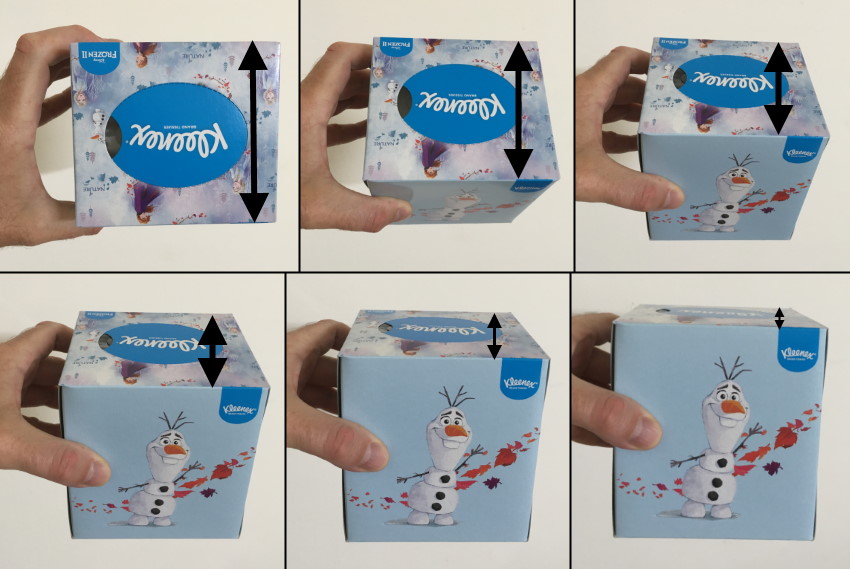
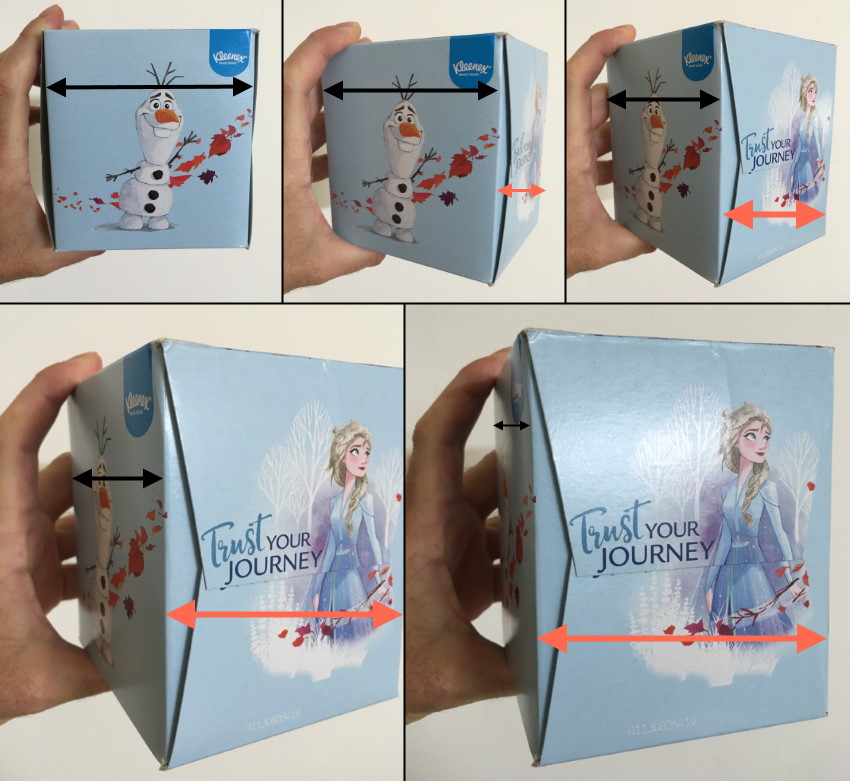
The more a plane is forth your line of sight, the more it is foreshortened.
If yous rotate a box sideways, one plane starts to become shorter, while the other becomes less foreshortened.
When drawing from ascertainment, it is best to describe what yous run into, and Not what you know.
With fourth dimension (meaning, with do and noesis), you lot tin reverse engineer the process, and depict what you know (draw from imagination).
You know that a table might take a rectangle peak, merely yous also know the ii rules of perspective:
1. Things get smaller the farther away they are.
ii. Objects are subject to foreshortening.
You tin utilize these rules to your table in perspective:
Now you can draw boxes and planes in perspective, considering foreshortening.
The same works for ellipses.
Ellipses
An ellipse (in perspective) is a foreshortened circle.
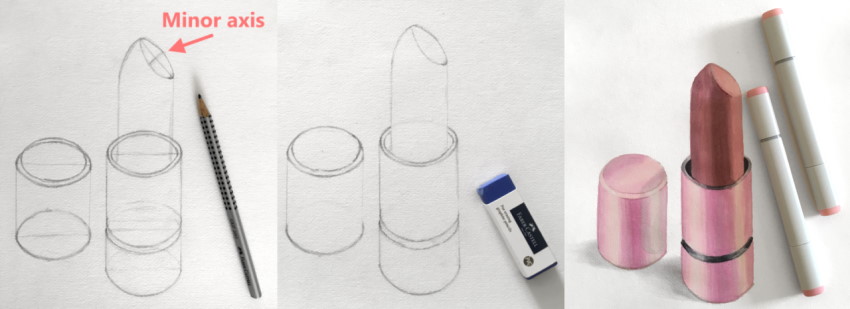
Information technology has a major centrality (long axis) and a minor axis (short axis).
The major centrality and minor axis are perpendicular to one some other.
Both sides of an ellipse along the major axis should be equal.
The same goes for both sides along the small axis.
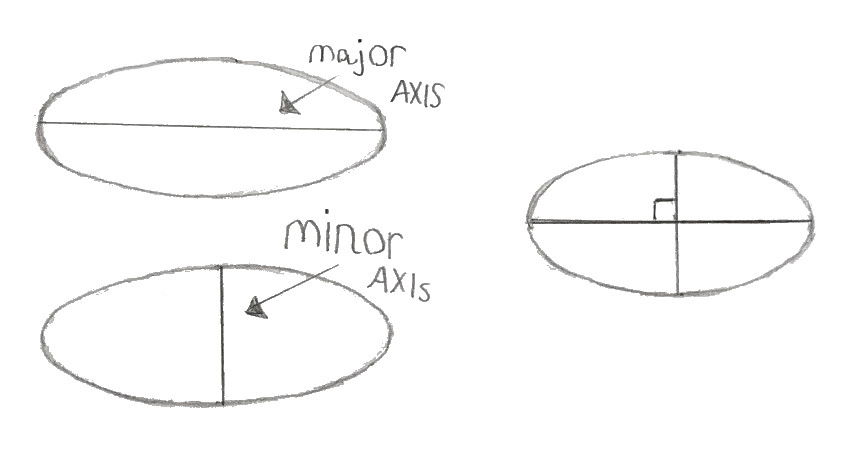
The small axis shows the amount of foreshortening.
In improver, the minor axis determines the management of foreshortening.
In other words, the direction of a cylinder.
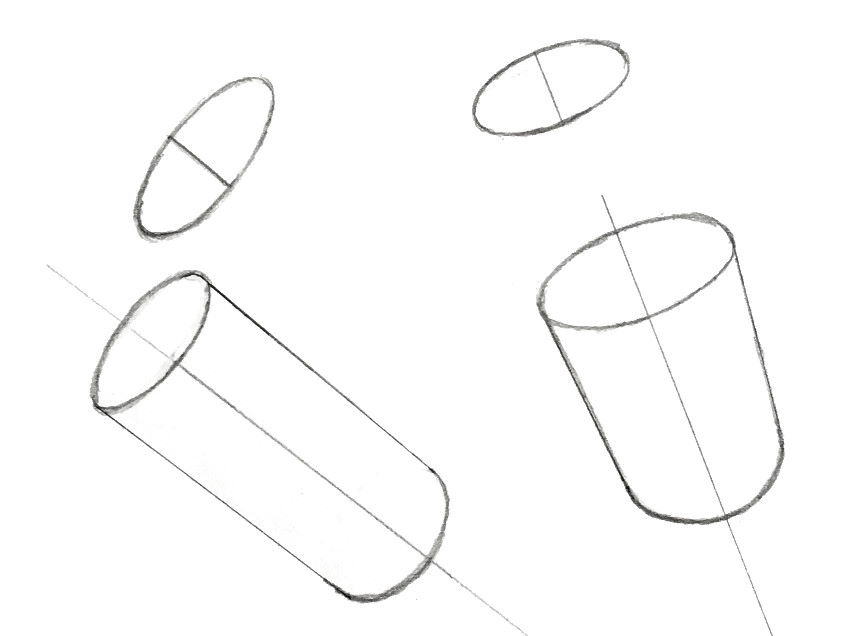
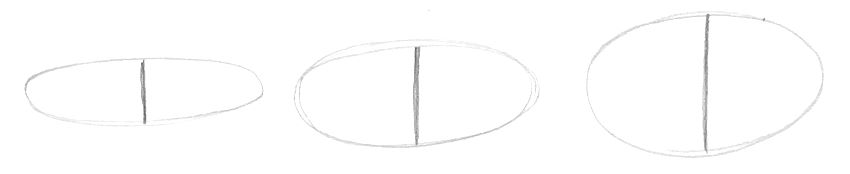
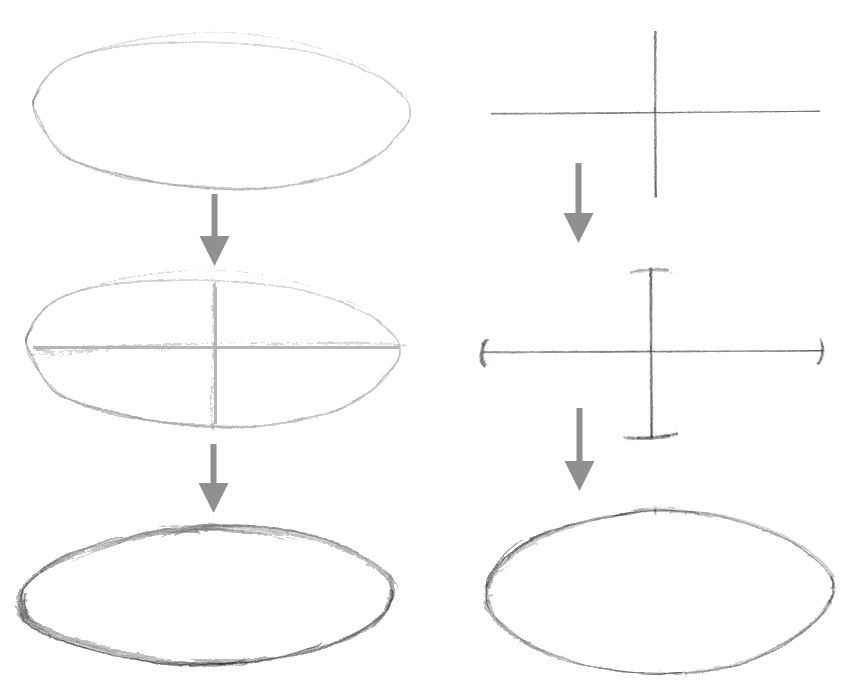
Information technology is a good practice to draw ellipses freehand.
If you struggle with cartoon a perfect ellipse, draw a major centrality and a pocket-sized axis inside your ellipse and right information technology.
Alternatively, depict the axes showtime. So, add together some rounded indication to the axes. Lastly, connect the lines.
For a rounded elliptical edge, draw a smaller ellipse (in diameter), and place it a chip higher in the direction of the pocket-sized axis.
Connect the two ellipses and erase the overlapping function (which should be hidden).

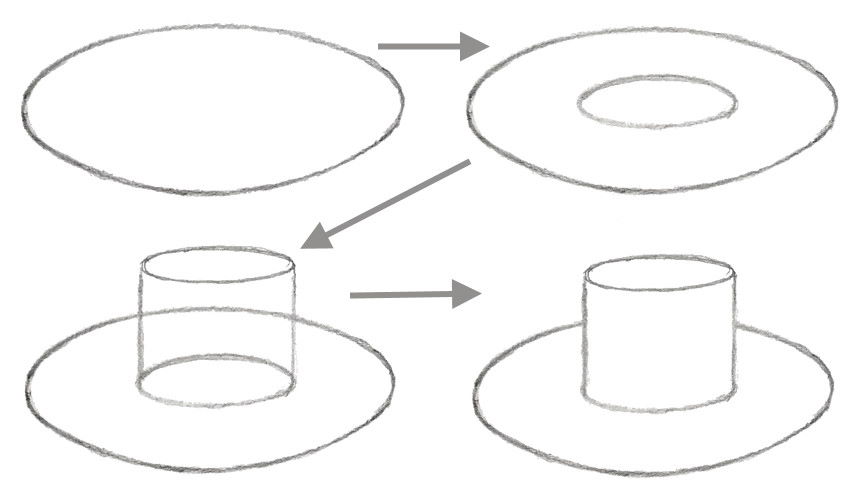
For an elevated ellipse, describe an inner (smaller) ellipse.
Then, raise two lines and draw an ellipse (depict a cylinder).
Finally, erase overlapping marks.
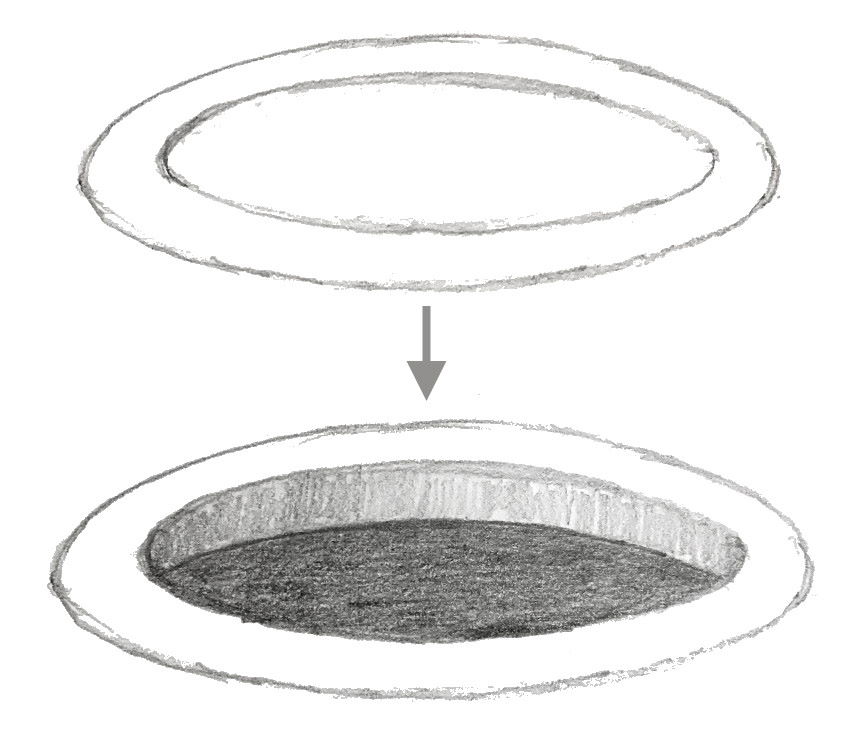
For a lowered (sunken) ellipse, draw an inner ellipse.
Then, depict a lower ellipse and erase overlapping parts.
When you want to depict elevated or sunken ellipses, there is ane more matter to consider.
From the first dominion of perspective (objects or planes look smaller when they are far away), you need to describe the far part of an ellipse smaller.
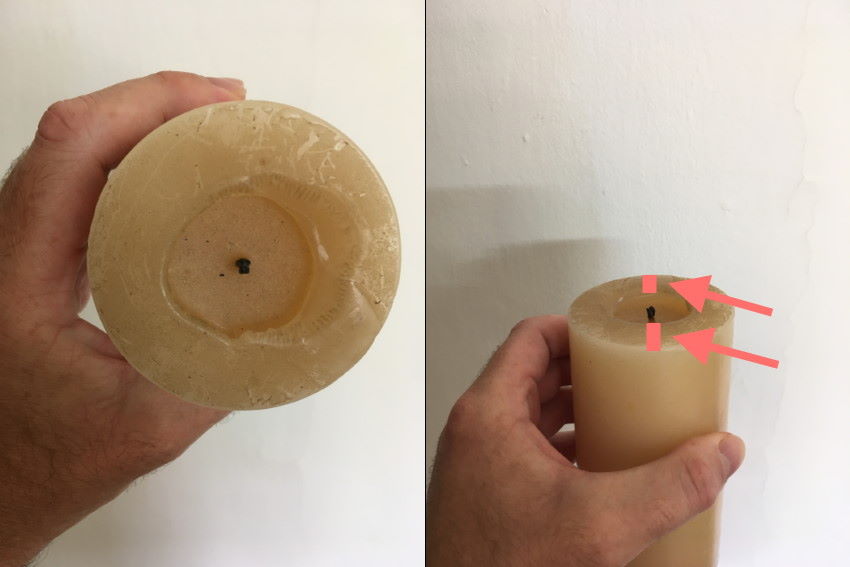
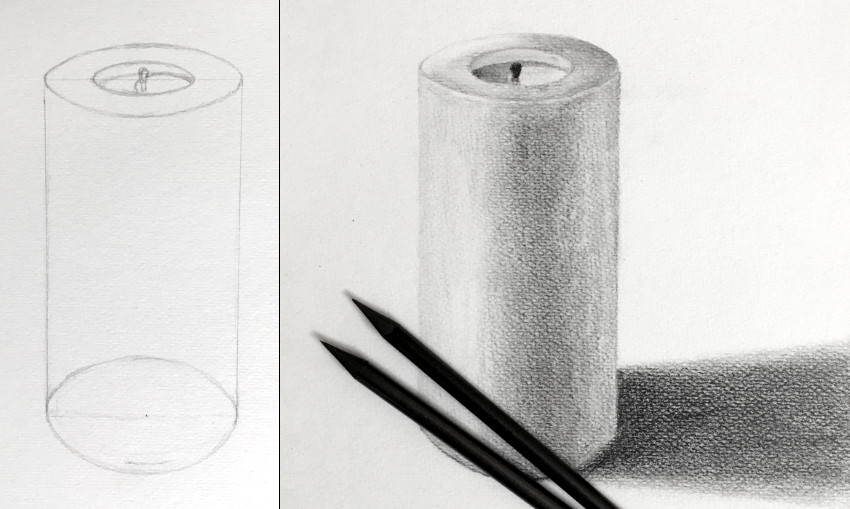
To describe a candle (or anything with a cylindrical body), you demand to understand cylinders.
I will cover that next.
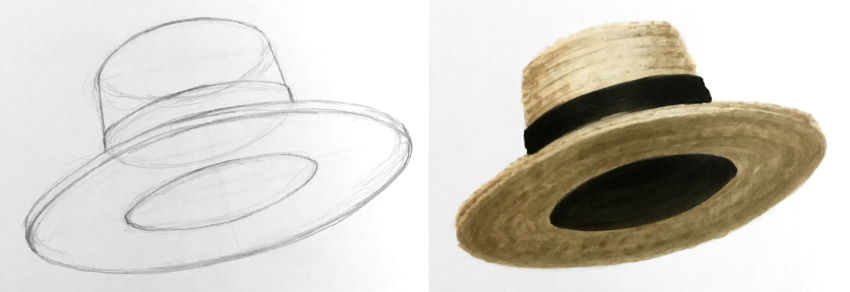
Use the knowledge you take on ellipses to describe some hats from imagination (or memory):
Cylinders
The top and lesser parts of a cylinder are circles (or ellipses when foreshortened).
From the offset rule of perspective, y'all know that objects expect smaller every bit they are farther abroad.
Notwithstanding, they keep the ratio between summit and width (there is no distortion):
The same is true for a cylinder torso.
It looks smaller with distance:
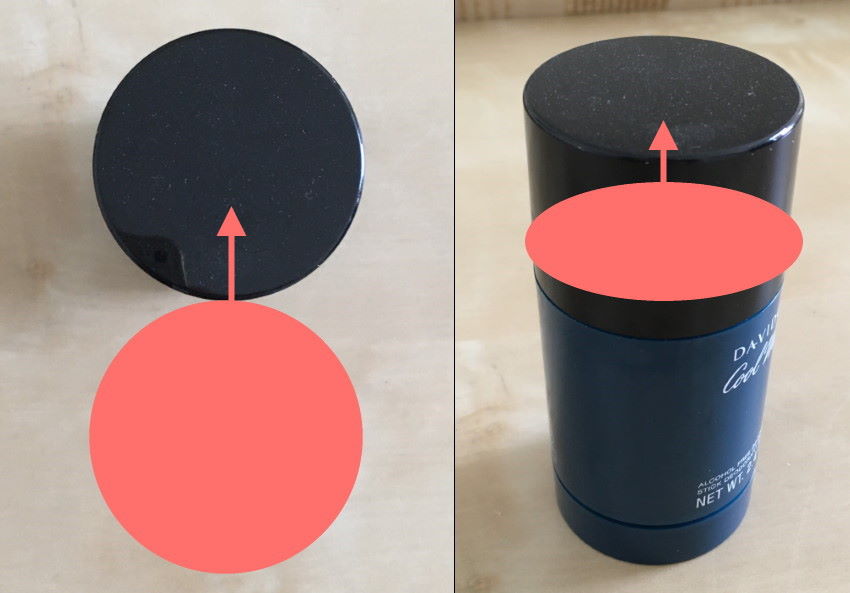
From the second rule of perspective, yous know that objects are subject to foreshortening.
The top office of a cylinder is a circle when in front of you.
When the angle of your sight is changing, the object starts to be along your line of sight (and becomes an ellipse).
The more than it is rotated to be along your line of sight, the more it is foreshortened.
Meaning, the distortion between elevation and width gets stronger:
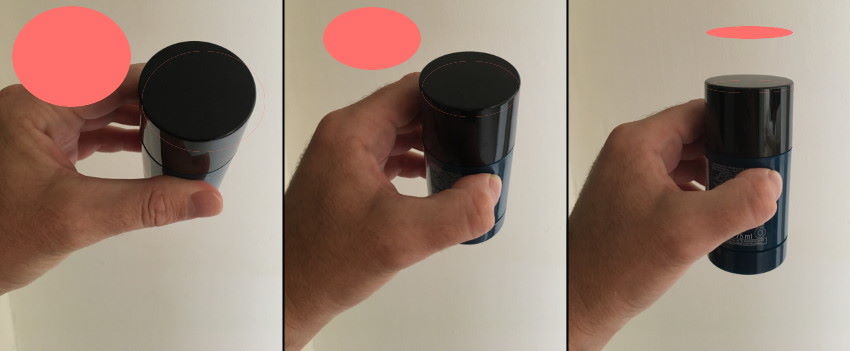
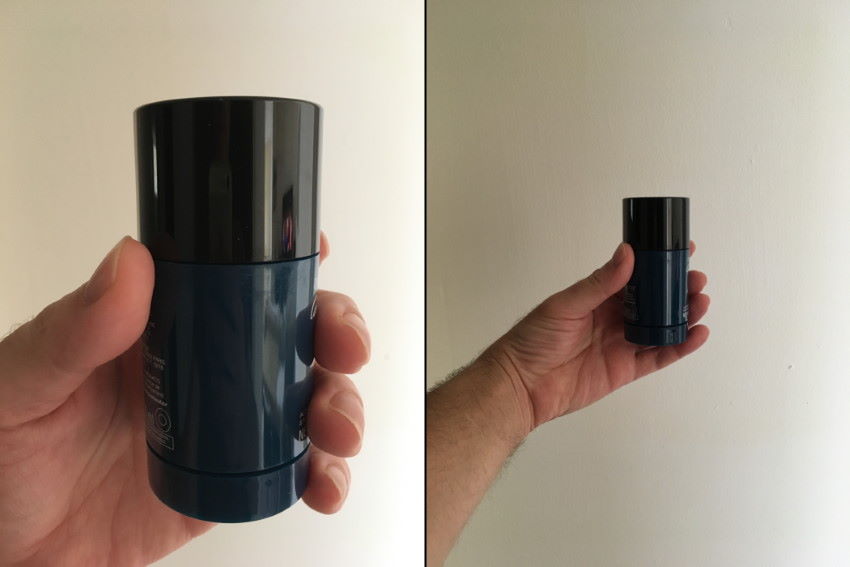
This is super important considering a cylinder has a long torso.
A long body means that you meet each office of a cylinder from a different bending of sight, and therefore with a dissimilar degree of foreshortening.
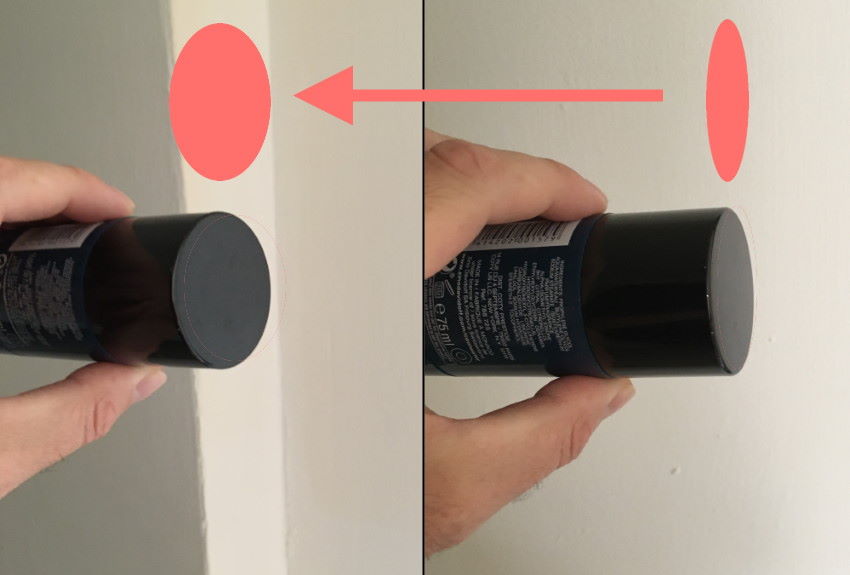
In the next example, a cylinder is moving to the left.
Your bending of sight changes to look at it when it is moving, and its top part becomes less foreshortened.
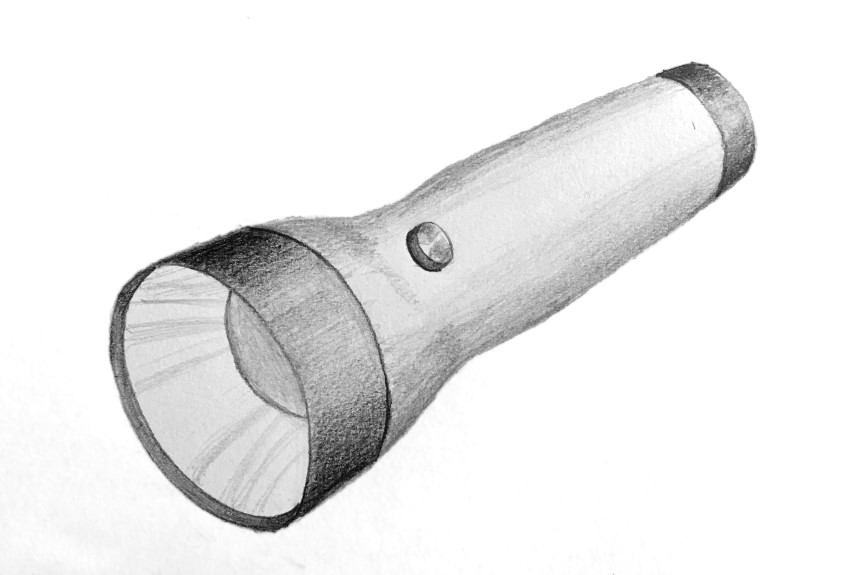
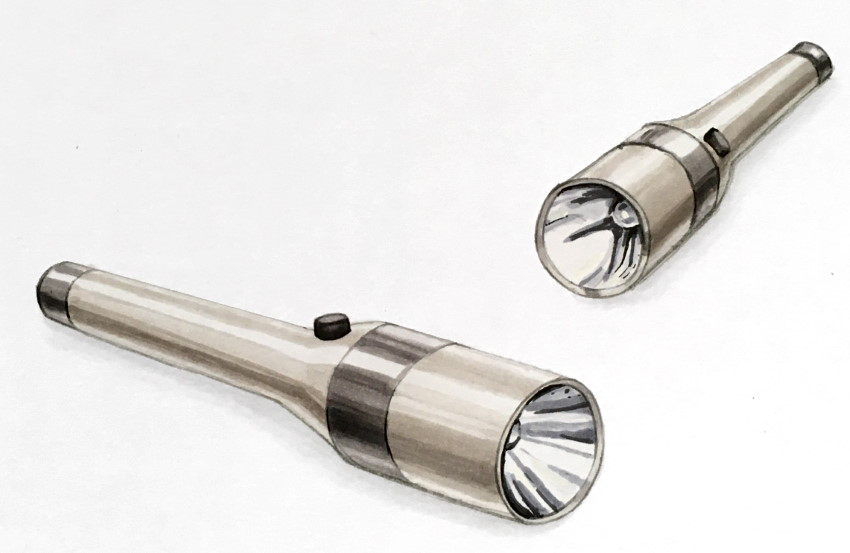
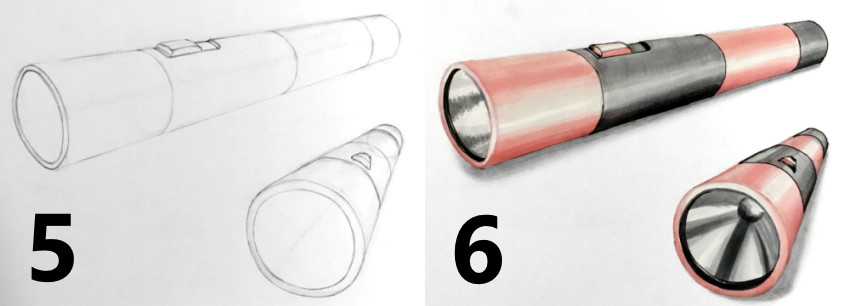
Now that you understand that, yous can draw a flashlight (for example) from imagination.
Y'all know that the left side of the flashlight has less foreshortening (Equally information technology moves sideways from the vanishing signal, which is in front end of you).
Consequently, the left ellipse is less foreshortened than the right ellipse:

And vice versa when drawing a flashlight with direction to your right side:
The same phenomenon happens when you lower a cylinder (below the horizon line, which is your eye level when looking forward).
The lower it is, the less it is foreshortened:
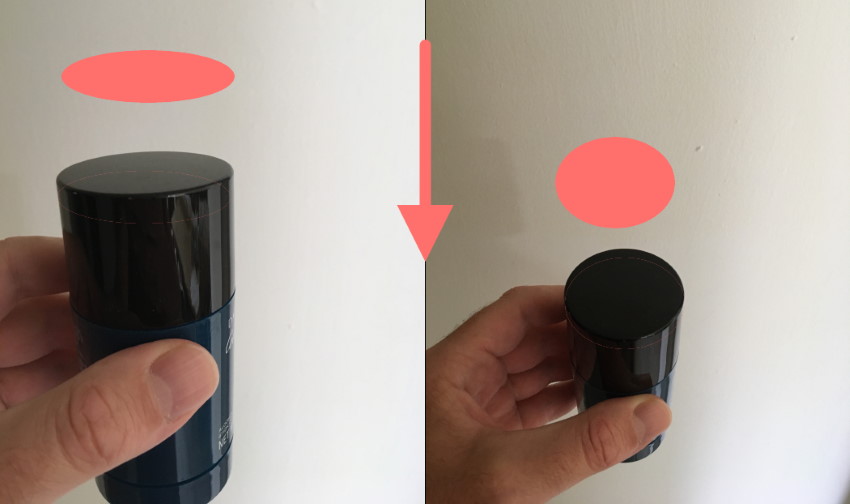
And then, ellipses have less foreshortening equally they are lowered below the horizon line.
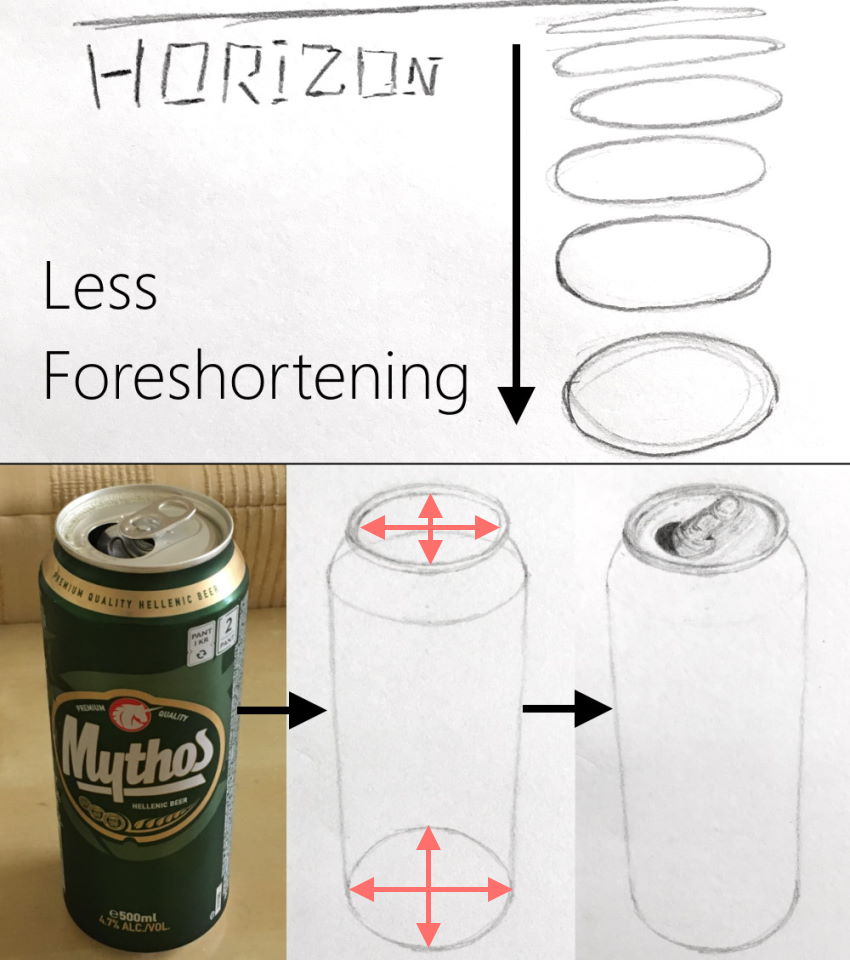
And vice versa, less foreshortening as they are higher above the horizon line.
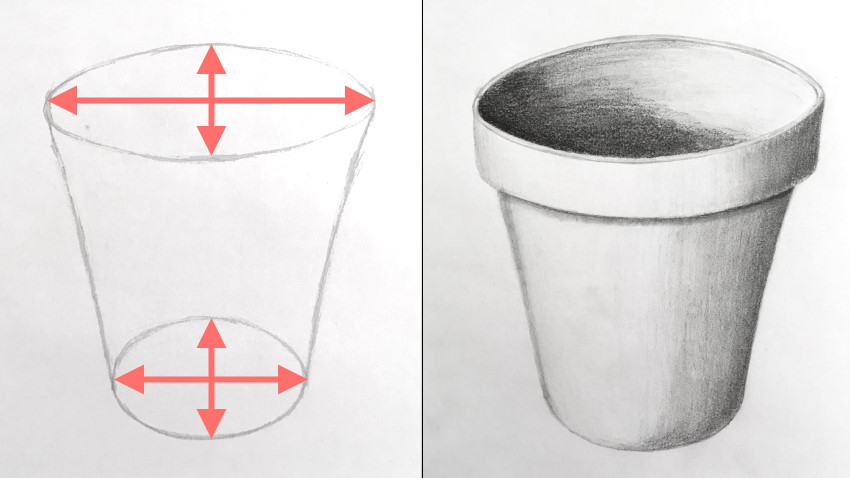
You can apply this knowledge to depict a plant pot (for example):
With the combined knowledge of cartoon ellipses and cylinders, y'all can draw anything cylindrical.
You can do it from observation, imagination or retentivity.
When drawing, rotate your drawing paper in a way that is well-nigh comfortable for you.
The terminal stride is rendering, and I will explain information technology side by side.
Rendering
Rendering is the final outcome.
The commencement step of drawing is planning. Meaning, choosing a topic and working on composition.
The purpose of composition information technology to create something interesting.
For more info on limerick, read my guide on how to depict a nonetheless life composition.
The 2nd step is designing (sketching and and so drawing), and adding details.
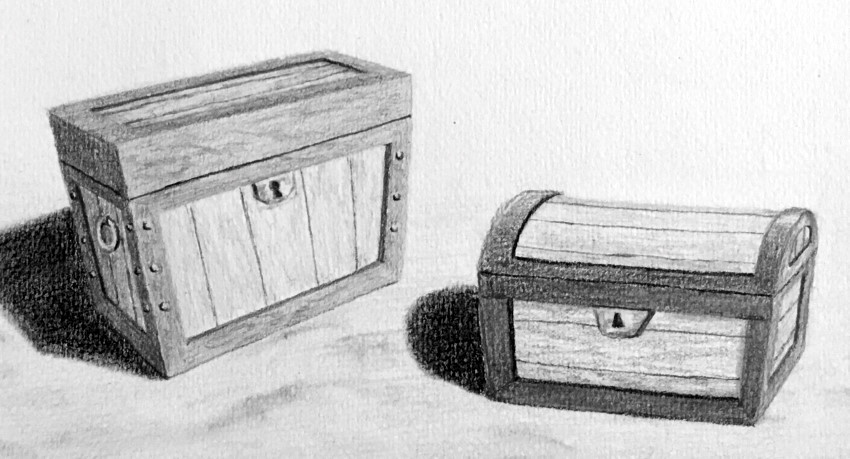
The final step is rendering. It is the time to use shading, texture, depth, bandage shadow, and anything else for your drawing to be with a quality of a finished artwork.
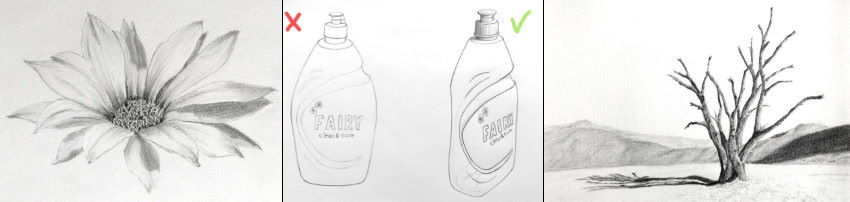
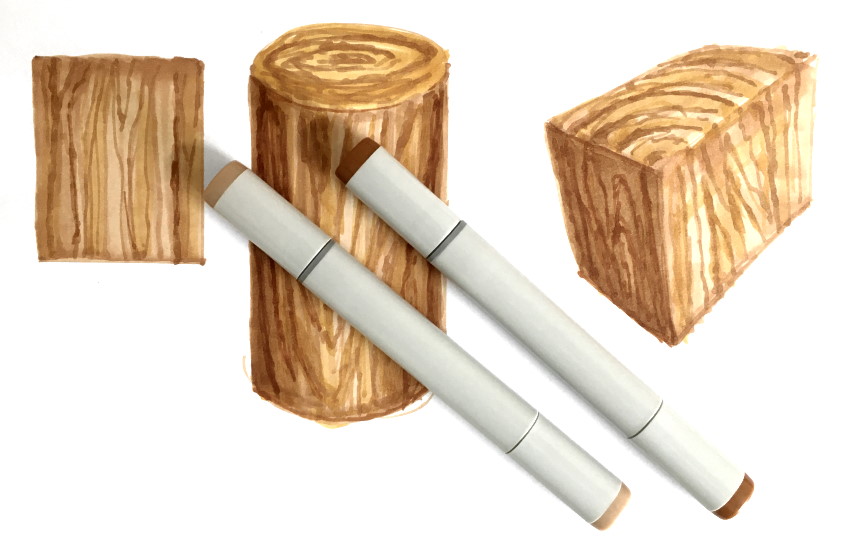
Start by observing some basic materials like wood, metallic, chrome, plastic, bricks, leather, etc.
Draw these textures and understand their patterns and relationships with light.
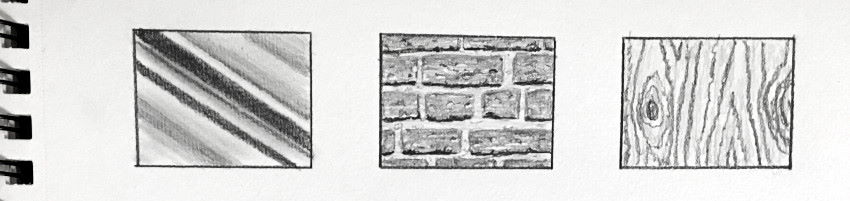
Adjacent, draw them on some basic shapes similar cylinder, box and sphere.
This do volition give yous the conviction to draw basic textures for your concept art and product pattern.
Important:
When drawing, decide where the lite is coming from and create a transition (gradient) from dark to light.
Recall that nighttime values will be darker in night areas (and lighter in light areas), and calorie-free values volition be lighter in low-cal areas (and darker in night areas).
In the next instance, look how the forest pattern becomes darker in the shadow areas.

Y'all can utilise different mediums to present (render) your artworks.
Any medium (oil paint, watercolor, gouache, colored pencils, acrylics, etc.) is acceptable. It is a thing of personal preference.
Y'all can do the same do with any medium. Here is an example with markers.
For recommended markers, visit my guide on markers for drawing.
Rendering with markers:
Rendering with pen and ink is a quick way to present your design.
Hither is my list of recommended drawing pens.

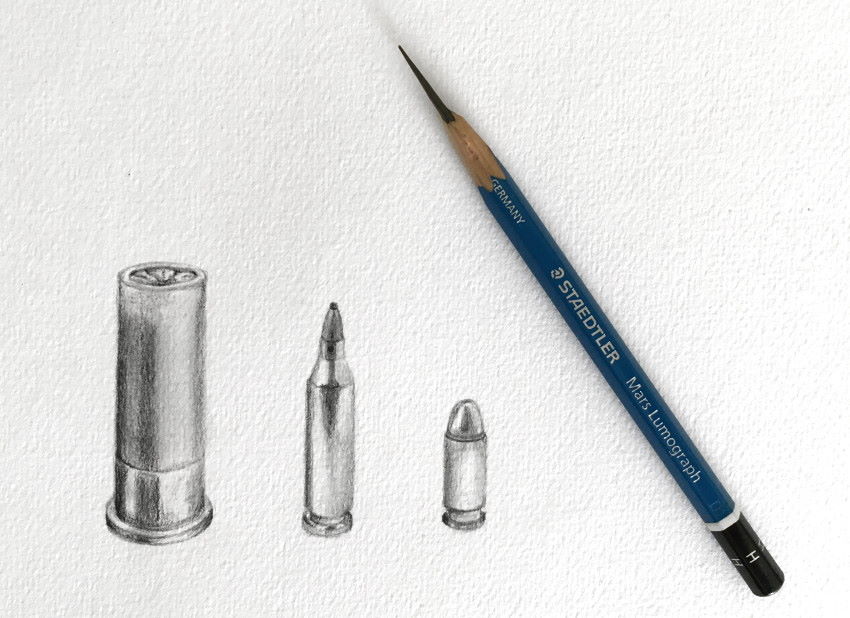
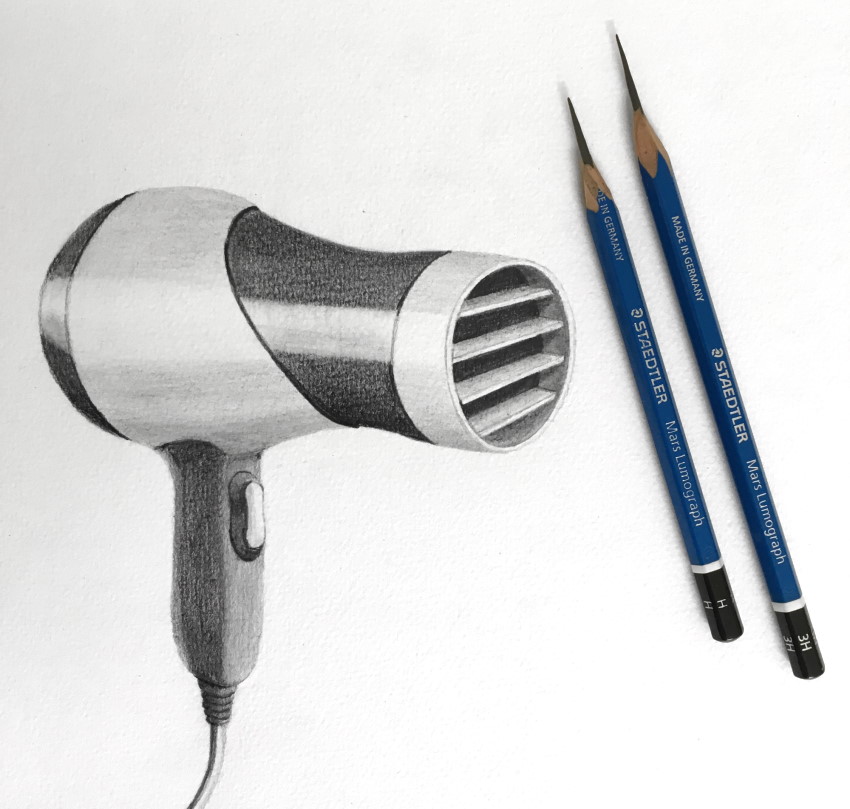
My favorite render style is realism. With pencils (in this example), or with any medium.
Think, there are no lines in nature, and therefore, no lines when drawing realism.
If you are unfamiliar with realism, visit my guide on how to draw in a realistic fashion.

Spheres
Spheres are quite easy to draw. On newspaper (2D), their outline is a circle.
To change a circle to a sphere, draw some lines, which will give both (the illusion of) depth and direction.
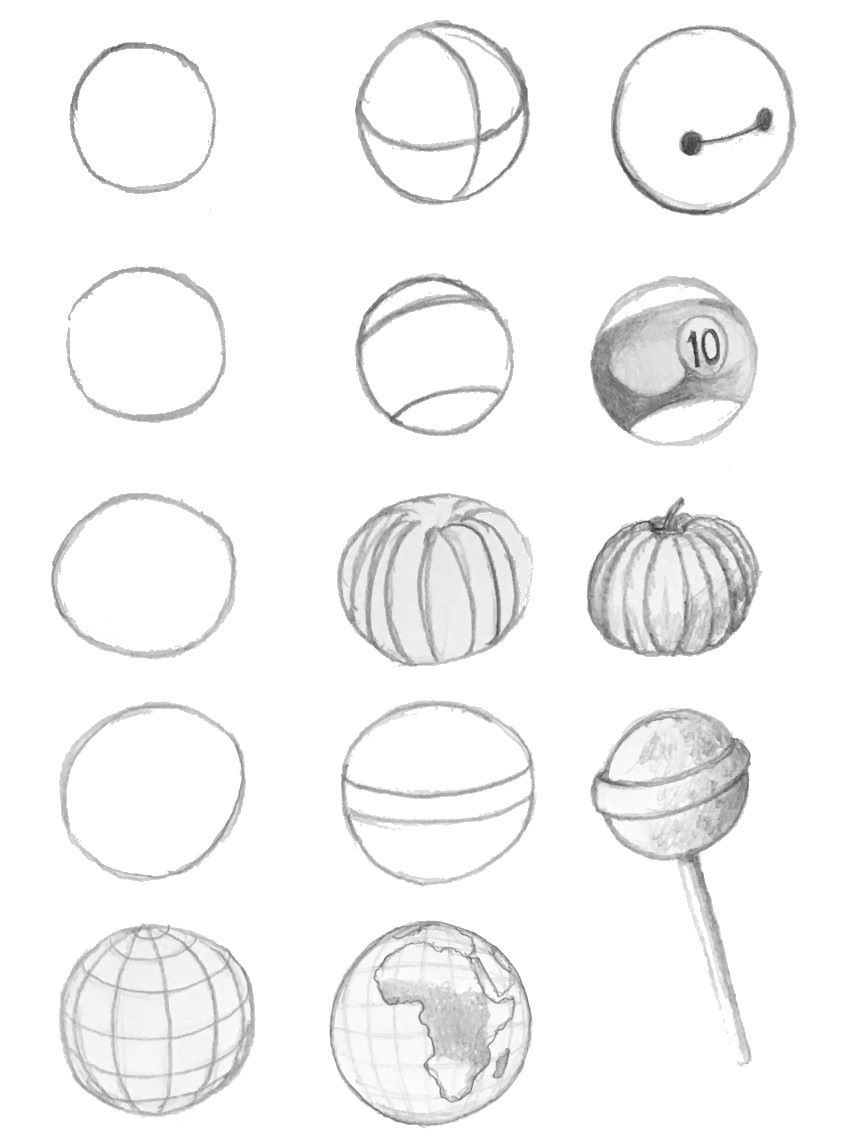
When looking at a sphere, the heart of it is in forepart of yous.
The parts of a sphere that are closer to the edge are starting to be forth your line of sight, and therefore foreshortened!
What works for a sphere (circumvolve), likewise works for other "spherical" shapes, like an egg, ellipses, or a peanut.
Past adding a couple of lines, information technology is easy to give information technology depth and direction (with consideration to perspective).
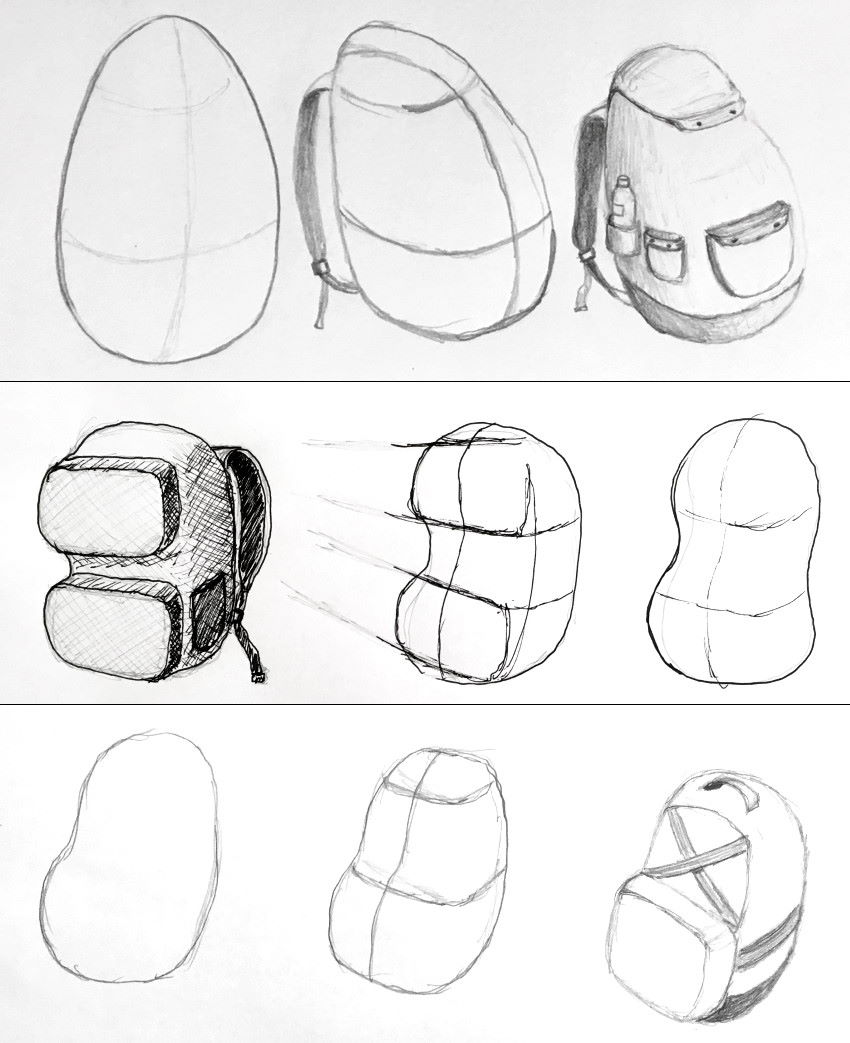
Sketches are meant to be quick.
The more yous practice with quick sketches, the more natural the drawing process becomes, making it easier to focus on a design.
In one case you are happy with a design, you lot can return it.
Concept Fine art
Concept art is the process of creating new and unique ideas.
Together with a adept story or theme, concept art is the basis for the video game industry.
Some genres in the film industry (like fantasy and science fiction), rely heavily on concept art, and so do comics and animation.
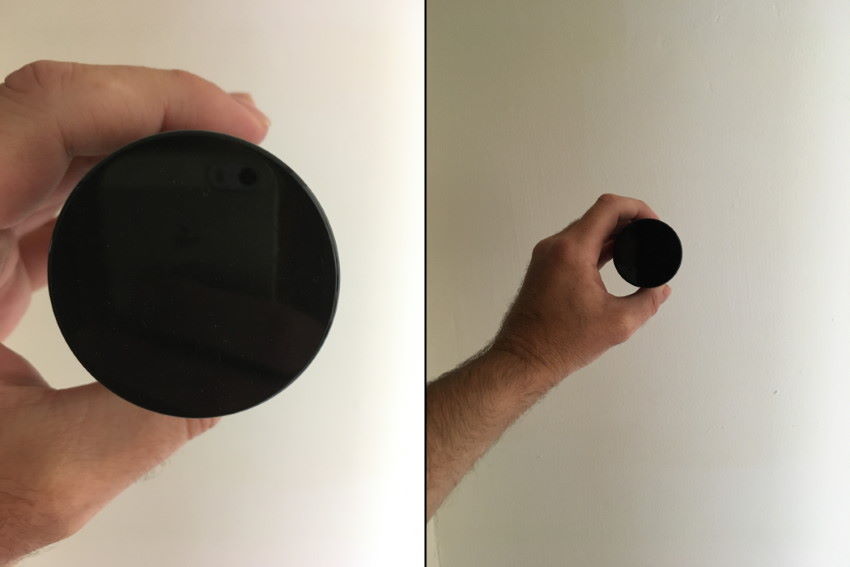
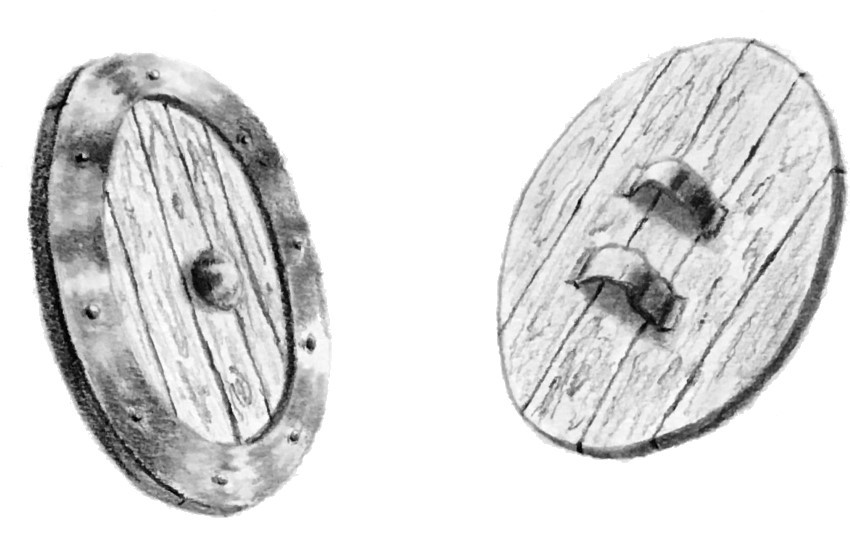
Arguably, the easiest shape to beginning with is a circular plane (circle).
Draw some round items in perspective (ellipses with different degree of foreshortening and direction, which is determined by the small centrality).
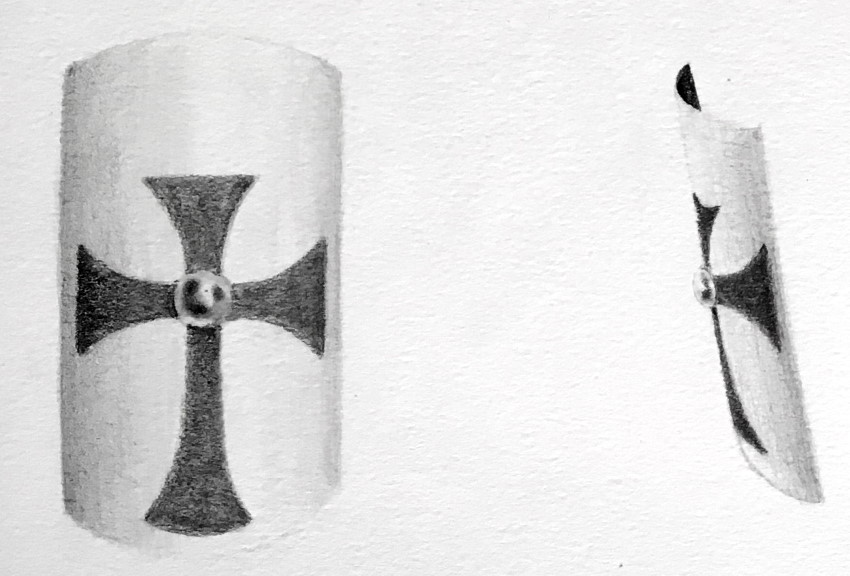
Information technology can be a plate, Frisbee, button, or a shield for a fantasy computer game.
The next shape to do on, is a rectangle in perspective.
In one case you lot are comfortable drawing circles and rectangles in perspective, try some cylinders.
Retrieve:
Use the minor axis to make up one's mind the direction of a cylinder, and pay attention to foreshortening.
Render your artworks with texture.
A circle fits perfectly inside a square.
Consequently, the center of a square is too the center of a circle.
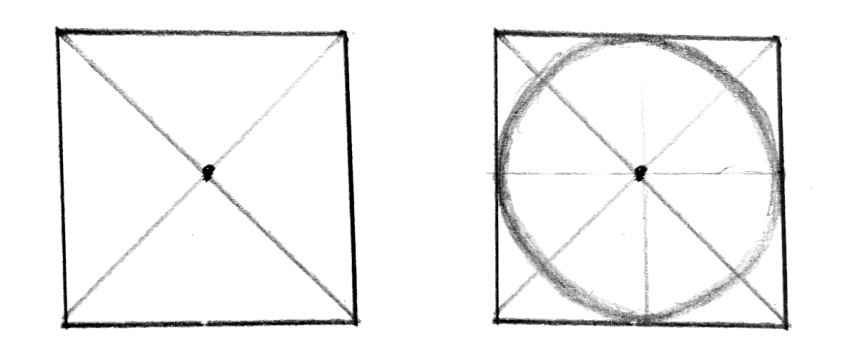
It is also true in perspective.
To notice the center of ellipses, in different amount of foreshortening, draw a cylinder inside a box.
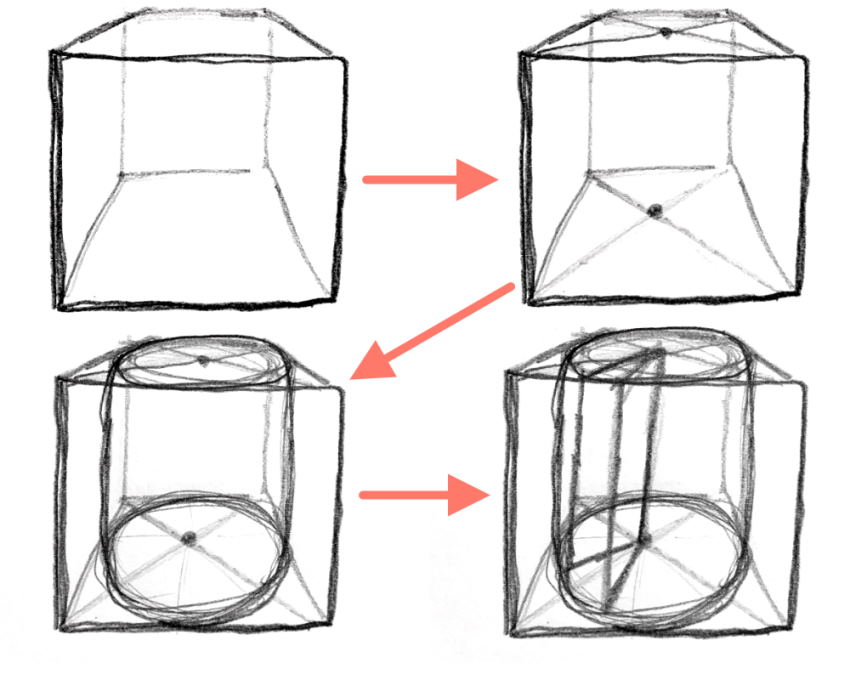
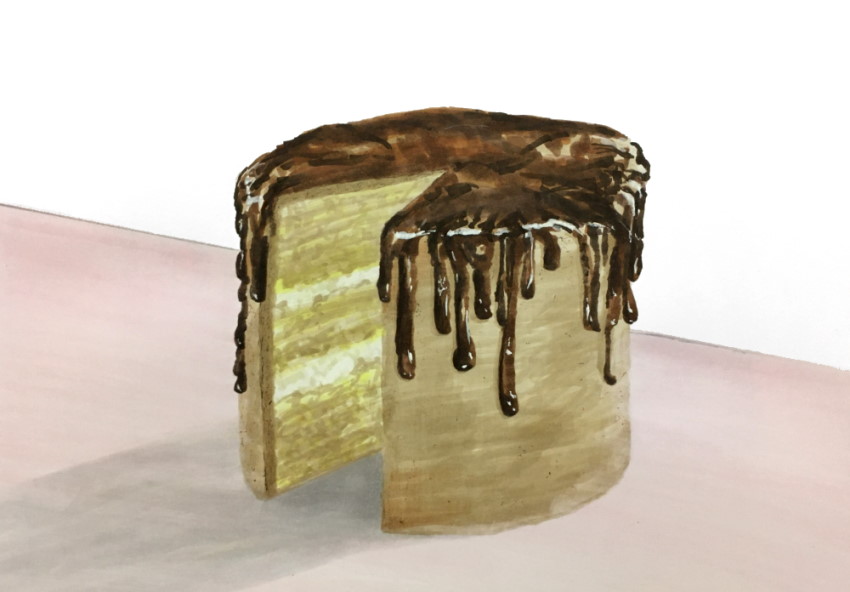
Now you can draw cakes from imagination.
Lastly, introduce boxes.
You can use linear perspective techniques, like split up or multiply, to place a ribbon in the heart of each plane.
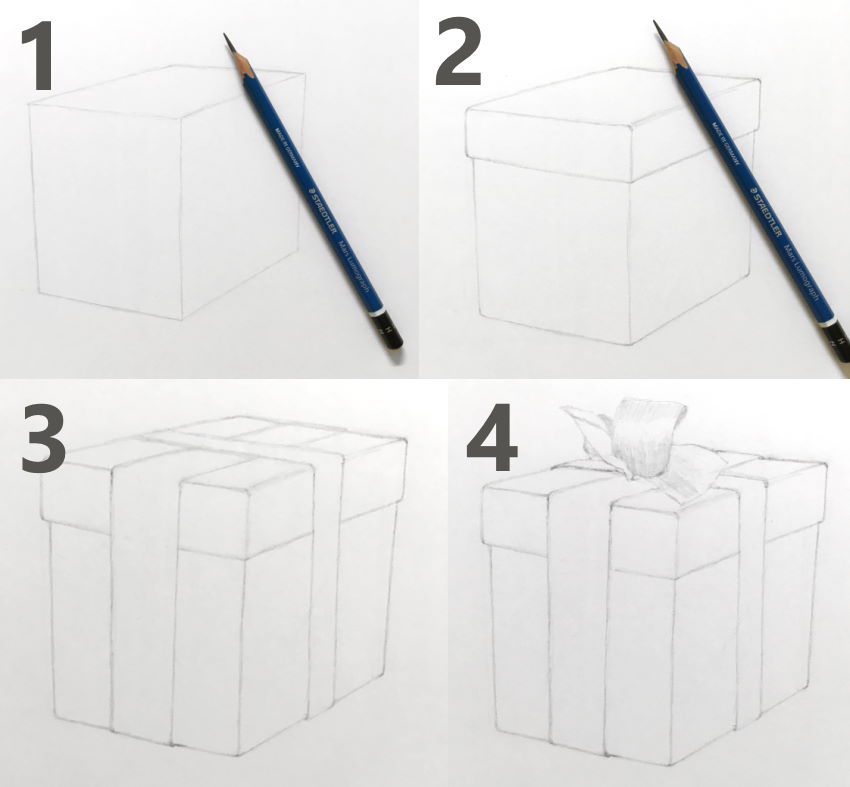
When it is fourth dimension to render, experience free to use mixed media.
Meaning, to use more than one medium.
In this example, I used markers to draw a box (from imagination), and added a person with pencils (from ascertainment).

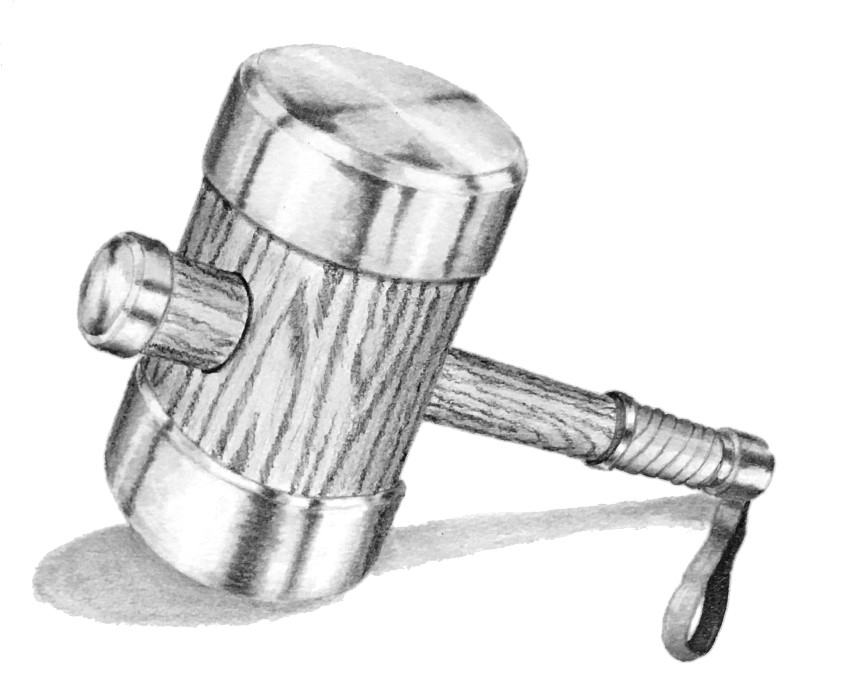
When you are comfy drawing box-shaped objects, experience complimentary to combine them with cylinders.
Important:
Although information technology is tempting to describe complex objects, start by drawing the basic shapes (circumvolve, foursquare, sphere, cylinder and box), from dissimilar angles.
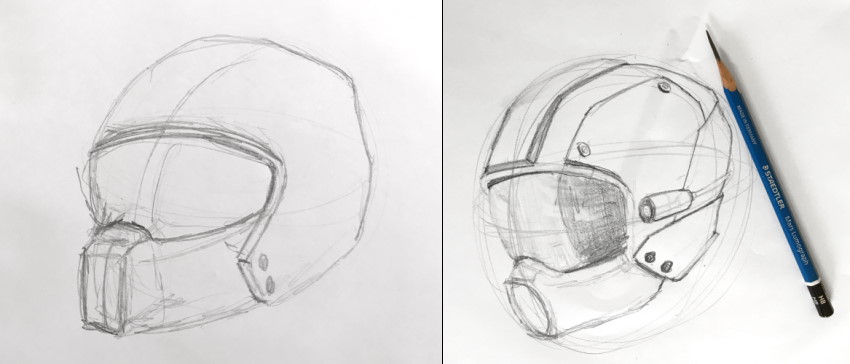
Complex designs:
Drawing complex objects often begins as bones shapes that you refine while cartoon several sketches.
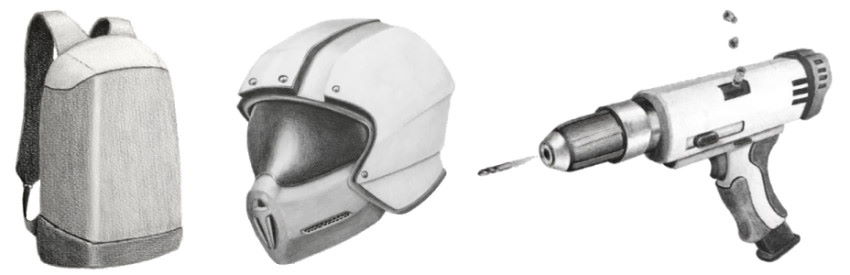
In the following example, I designed something that might be in the James Bond pic category, which is something between concept fine art and product design.
I ordinarily start with an idea, so some sketches and lastly, refinement and rendering.
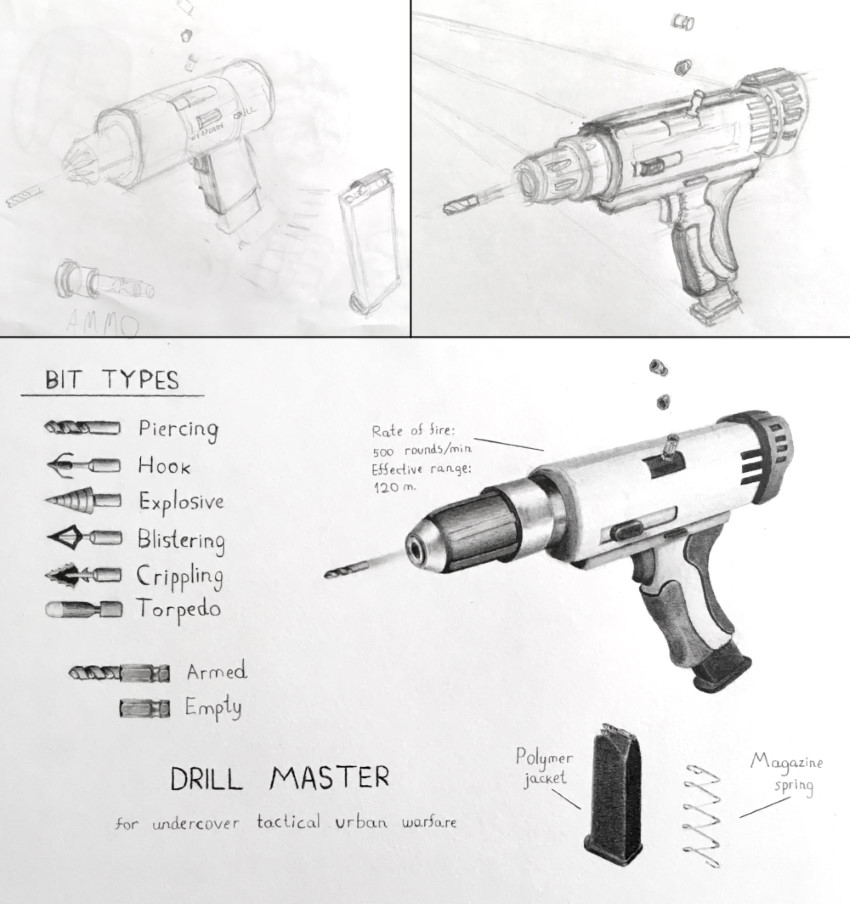
Something to consider:
Drawing concept art is, in a way, inventing something that does not exist.
So, when I decided to draw a weaponized drill, I had to research both drills and guns, learning which parts they are built from, and how they piece of work.
It is a skillful practice to research the subject you depict, for ideas and management.
In add-on, information technology is also advisable to be very loose when sketching several designs and angles, before committing to the terminal design and render.
Product Design
Anything that is man-fabricated has to be designed. Tables, computers, cars, shoes, lamps, houses, etc.
Therefore, a more conscientious arroyo is needed when designing a product.
You have to think about comfortability, usage, safety, materials, price, human being factors, ergonomics, and other factors, depending on the project.
Cylinder shape products:
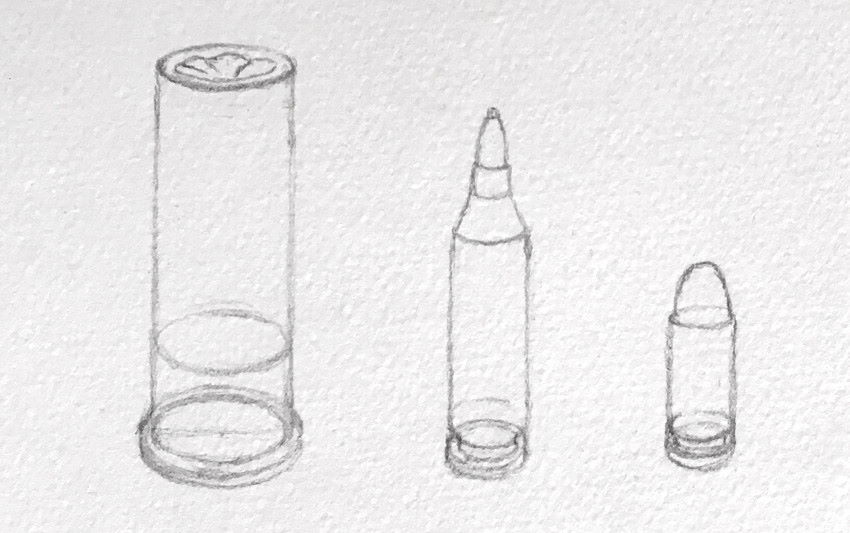
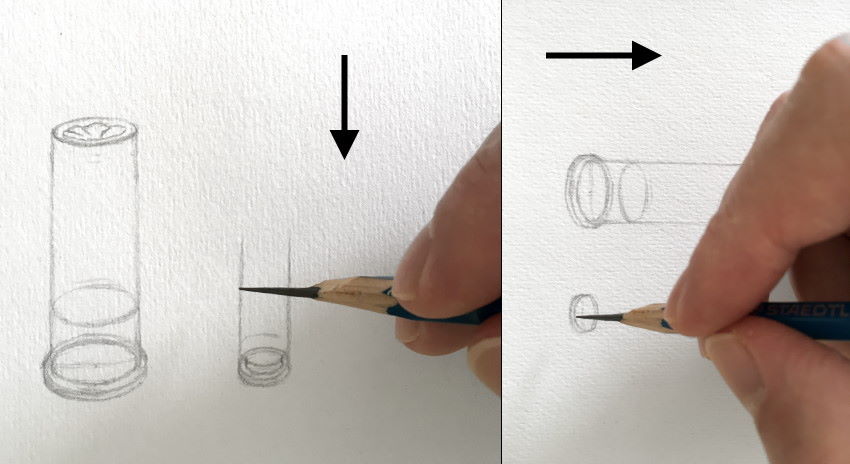
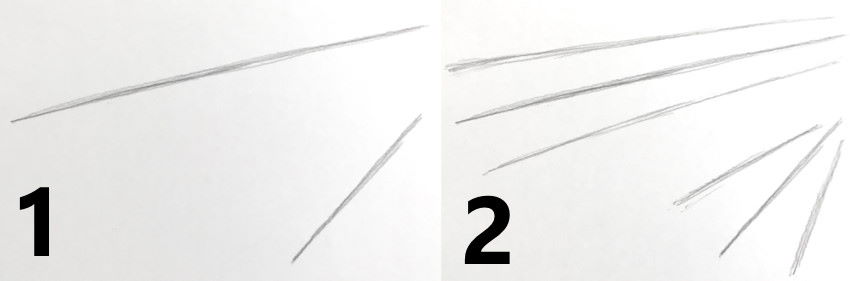
For designing products with a cylinder shape, y'all can start with a line.
This line is very of import; it is the direction of your cylinder, just also the small centrality for your ellipses.
Draw a short line for a foreshortened body, or a longer line for a less foreshortened body.
At present that yous have the management, you lot tin add together two lines for the trunk's width (remember that in perspective, the lines will converge).
Next, add equally many ellipses as required for your pattern.
The farther away an ellipse is, the less it is foreshortened.
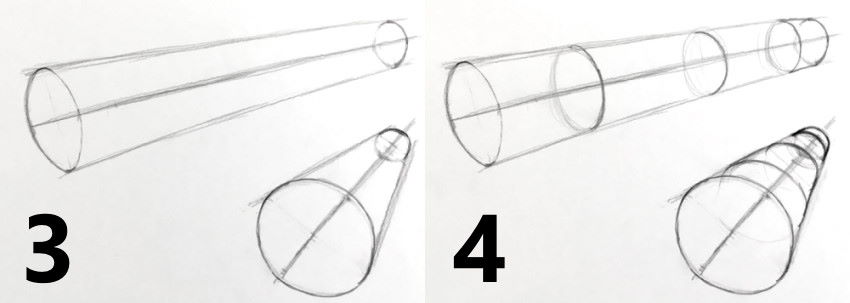
Lastly, end your drawing and return it.
When an ellipse is in a dissimilar direction, the minor axis will guide you lot.
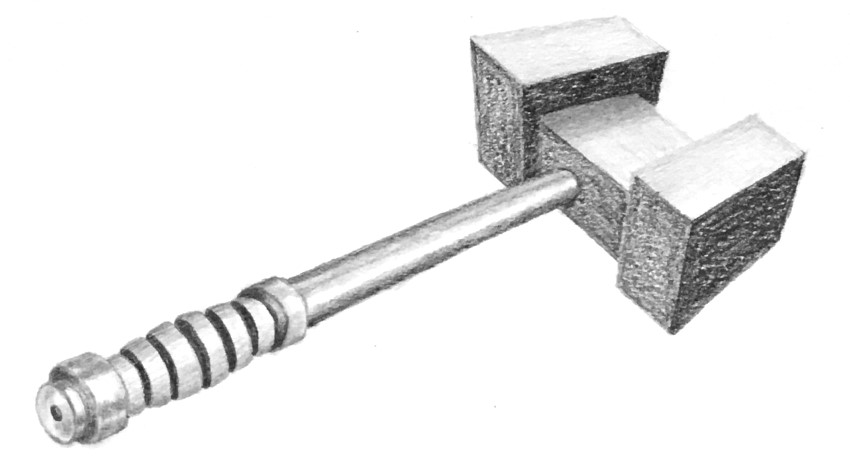
Advanced designs:
Now that y'all know how to draw boxes and cylinders in perspective, it is fourth dimension to combine them.
For this example, I designed a archetype joystick.
Kickoff by drawing a box and find its middle.
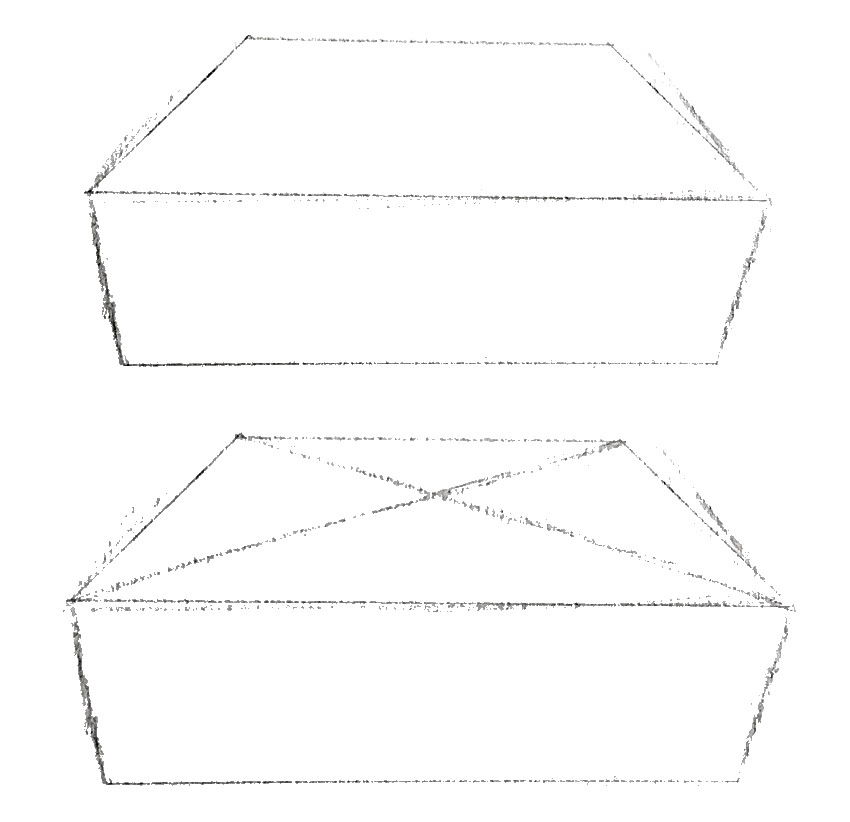
Depict an ellipse in the middle, and raise a cylinder (for the handle).
Describe another ellipse for an elevated button.
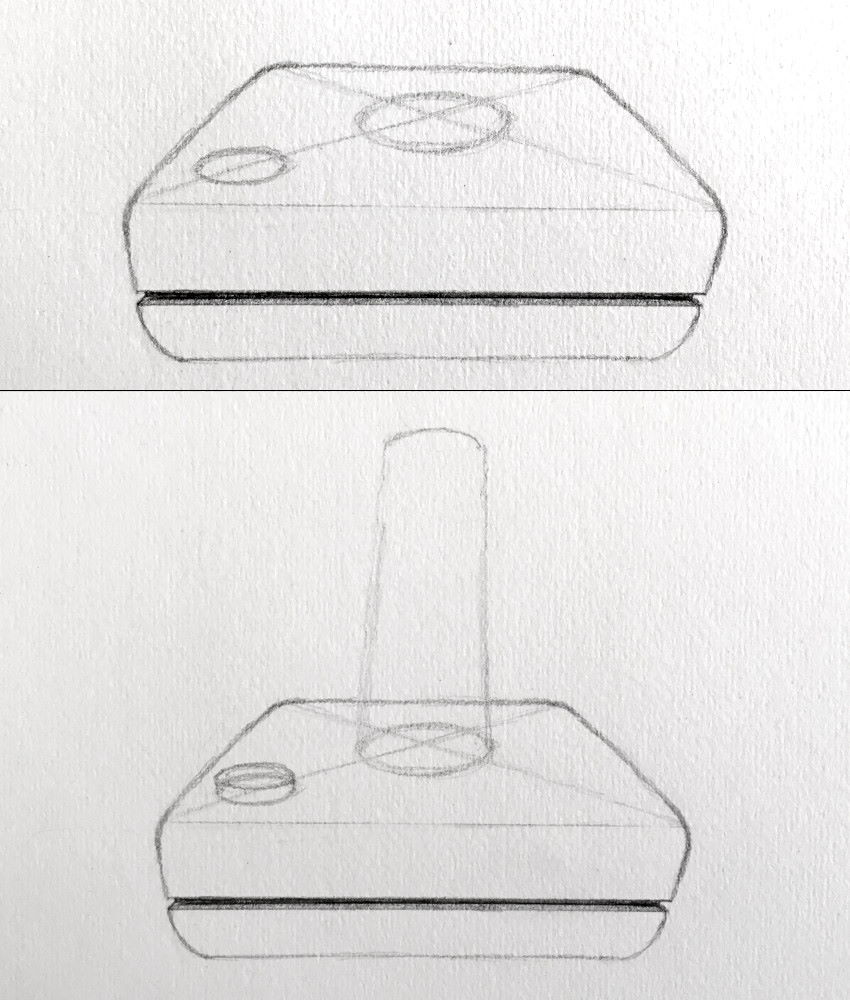
I decided to add another button, on tiptop of the handle.
In my offset pattern, the vanishing point is in the middle of the cylinder (red lines).
In that case, the top push button cannot be seen, because it is above the horizon line.
The solution is to enhance the vanishing point (green lines), and right the design accordingly.
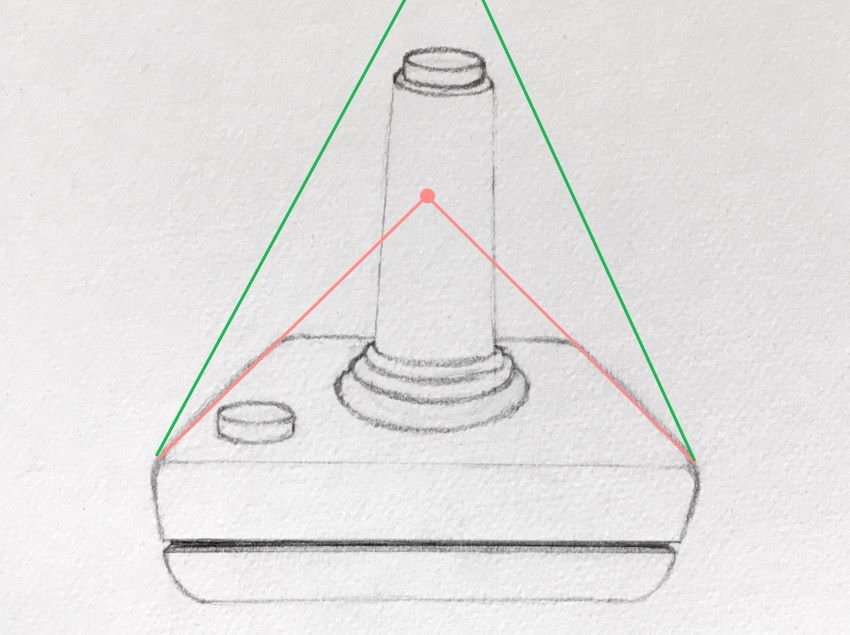
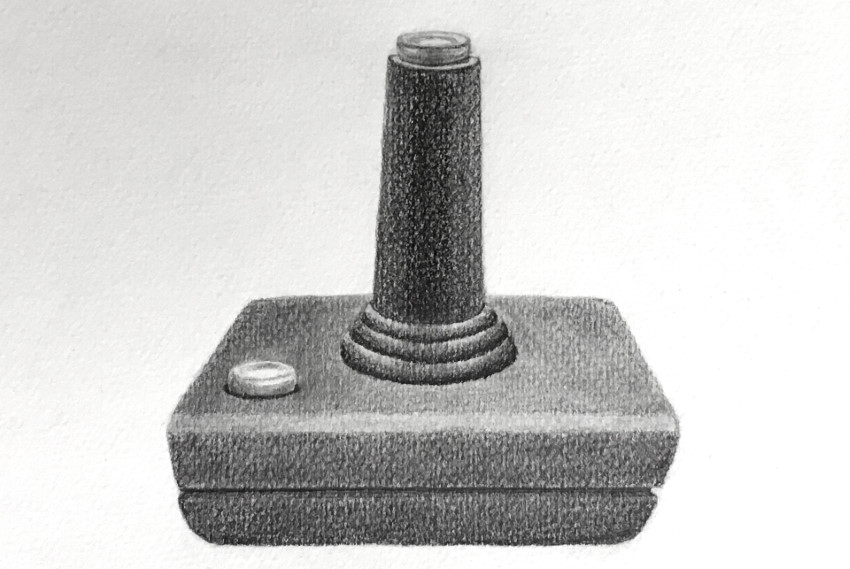
The last step is rendering.
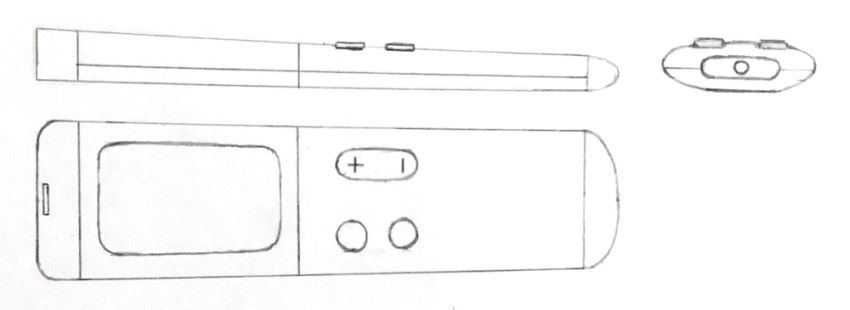
One way to arroyo product design, is to first draw some orthographic views.
Depending on the complexity of the object, sometimes just one or 2 views are enough. In farthermost cases, you might need views from all sided (top, lesser, front end, back, left and right), in gild to draw an object from dissimilar angles.
In many cases, designing is easier with orthographic views.
For a remote control, I used side, top and front views:
At present it is easier to draw it in perspective, which is more interesting.

Once yous feel comfortable drawing box-shape objects and cylindrical objects (and combining them), you tin pattern complex objects.
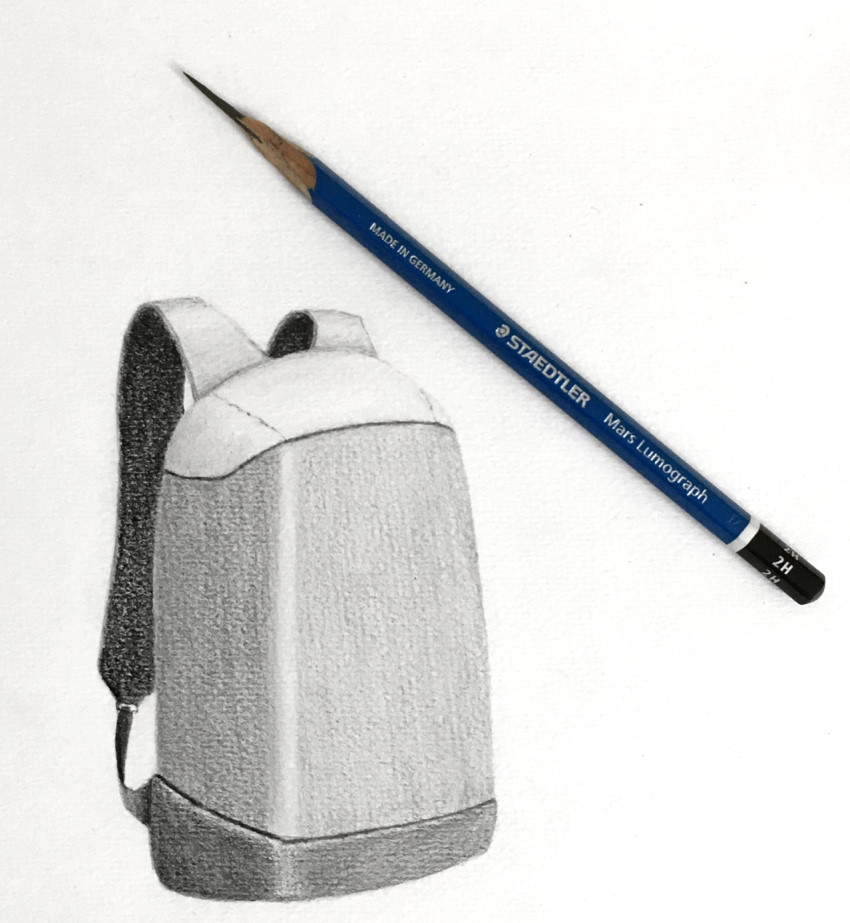
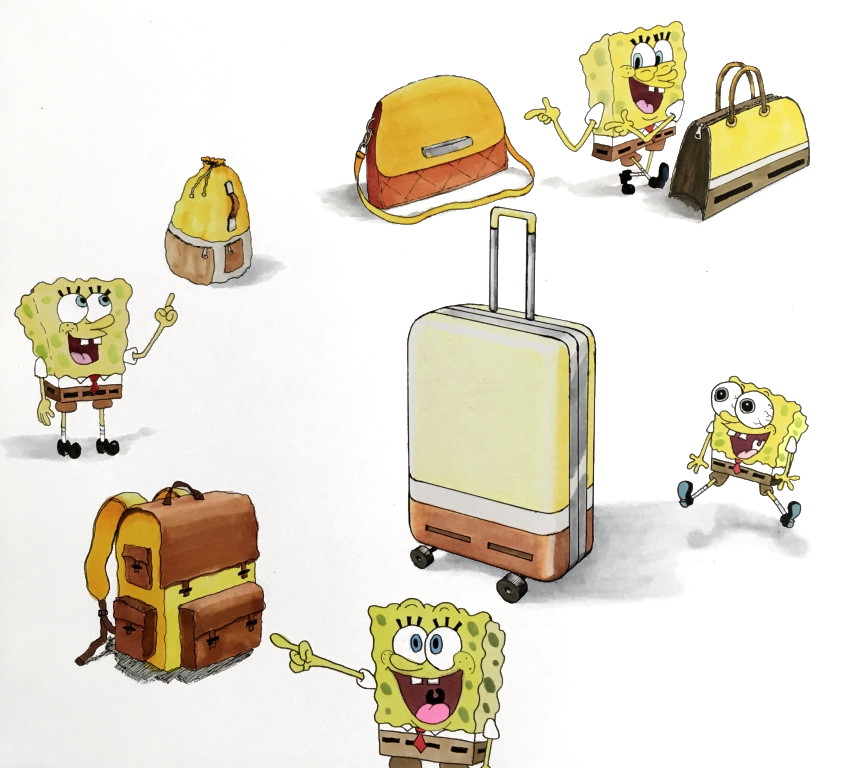
Sometimes, you might want to add context to your designs.
In the adjacent example, I drew some SpongeBob bags and backpacks.
Although the numberless are structured in a "square" manner and have the SpongeBob colour blueprint, there is something missing.
That missing thing is context. In this instance, SpongeBob figures.
Whenever I want to depict something for the outset fourth dimension, it can be challenging.
Regardless of my knowledge in perspective, I volition employ these 2 steps:
1. Search for reference images to understand the structure and functions of the object I desire to draw.
2. Depict some quick sketches to explore dissimilar blueprint ideas.
When I decide on a last design, I will return it:

Summary
Knowledge and feel in the craft of cartoon is the basis for drawing from imagination.
Once you have the knowledge, you can use your imagination, influences, and preferences, to create your own unique artworks.
If you struggle with drawing from imagination, I suggest practicing offset on cartoon from observation (photos), directly observation (from life), and in perspective (learning linear and atmospheric perspective).
With practice, the process becomes natural, and consequently, y'all will think less on how to draw, and more on what to draw.
Note:
As mentioned in a higher place, when I draw from imagination, I similar to do it freehand, with no rulers or vanishing points.
This results with some cede in accuracy, but I adopt my drawing procedure to be flowing and enjoyable.
Where to go adjacent:
To acquire more than virtually depth, cheque out my guide for drawing the illusion of depth. It teaches fifteen methods to add depth and space to your art (including MANY examples).

![]()
![]()
Copyright © RanArtBlog.com. All Rights Reserved. | Sitemap

Source: https://ranartblog.com/blogarticle12.html
Posted by: codytherintord.blogspot.com
0 Response to "How To Draw Poses From Imagination"
Post a Comment